变量类型 变量通常由字母、数字和下划线构成,不能以数字开头,区分大小写
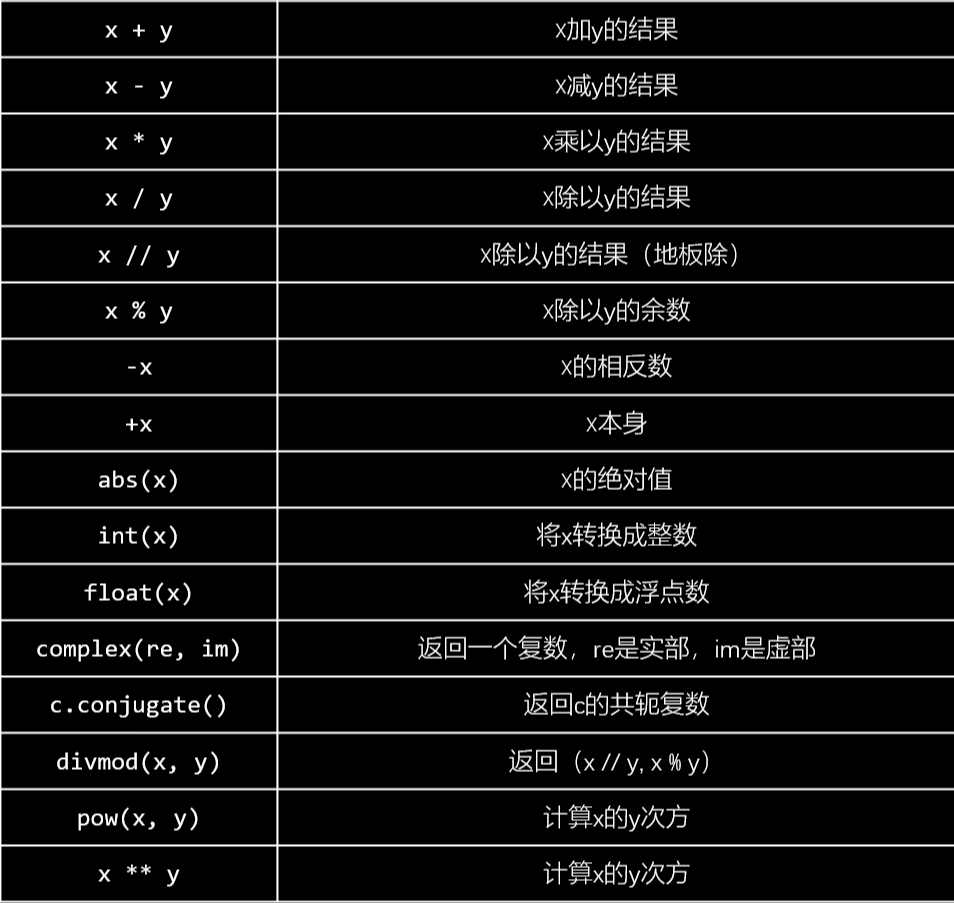
整数长度不受限制;采用IEEE754的标准存储浮点数,有误差,可以用 decimal 模块;复数的实部和虚部是以浮点数的形式存放的,x.real x.imag;
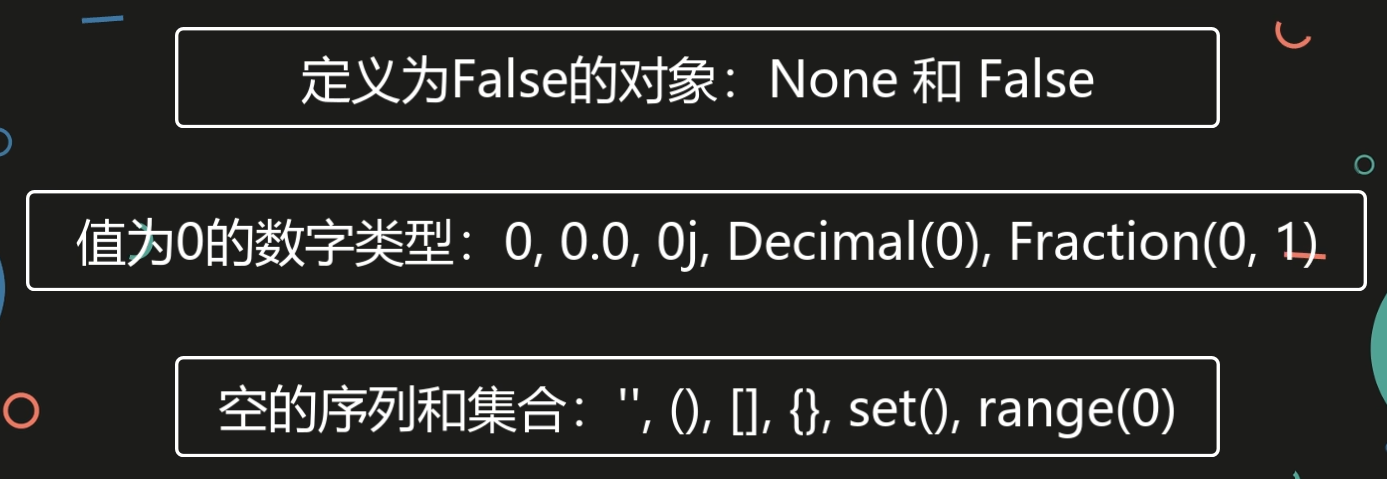
布尔值
逻辑运算符:and, or, not ,优先级为 not, and, or
逻辑运算符遵循短路逻辑,即从左往右,只有当第一个操作数的值无法确定逻辑运算的结果时,才对第二个操作数进行求值
运算
转义字符 在需要在字符中使用特殊字符时,python 用反斜杠 \ 转义字符。如下表:
转义字符
描述
(在行尾时)
续行符
\
反斜杠符号
'
单引号
"
双引号
\a
响铃
\b
退格(Backspace)
\e
转义
\000
空
\n
换行
\v
纵向制表符
\t
横向制表符
\r
回车
\f
换页
\oyy
八进制数,y 代表 0~7 的字符,例如:\012 代表换行。
\xyy
十六进制数,以 \x 开头,yy代表的字符,例如:\x0a代表换行
\other
其的字符以普通格式输出
1 2 3 print ("D:\\Downloads\\media" )print (r"D:\Downloads\media" )
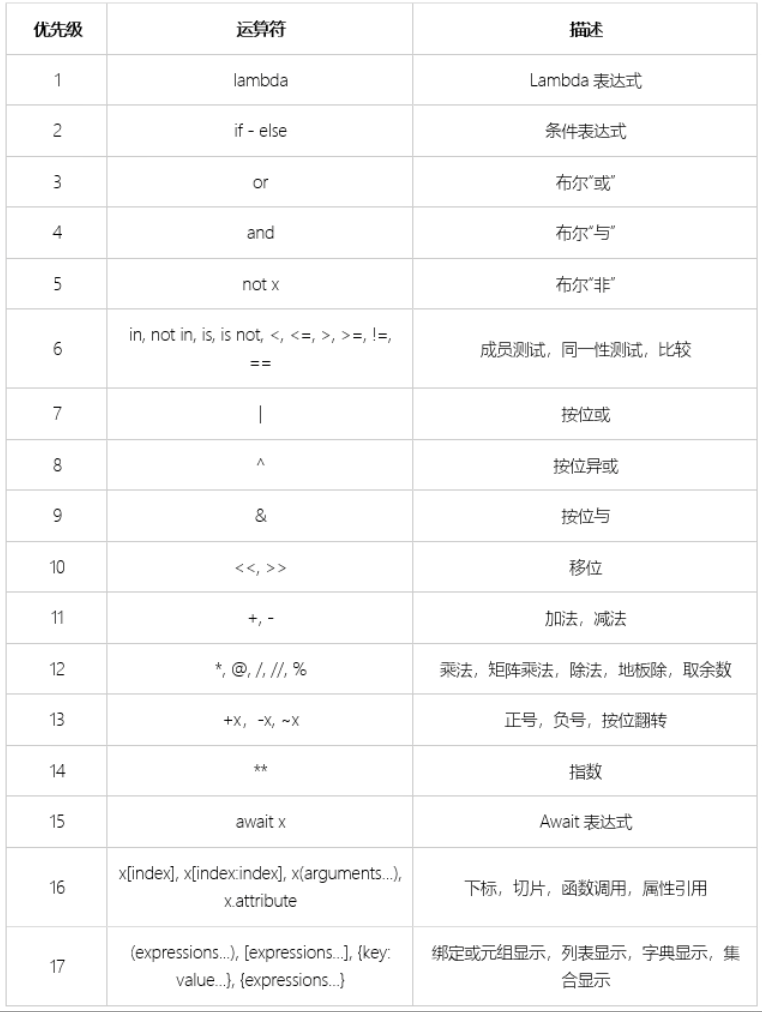
运算优先级 优先级越大越高
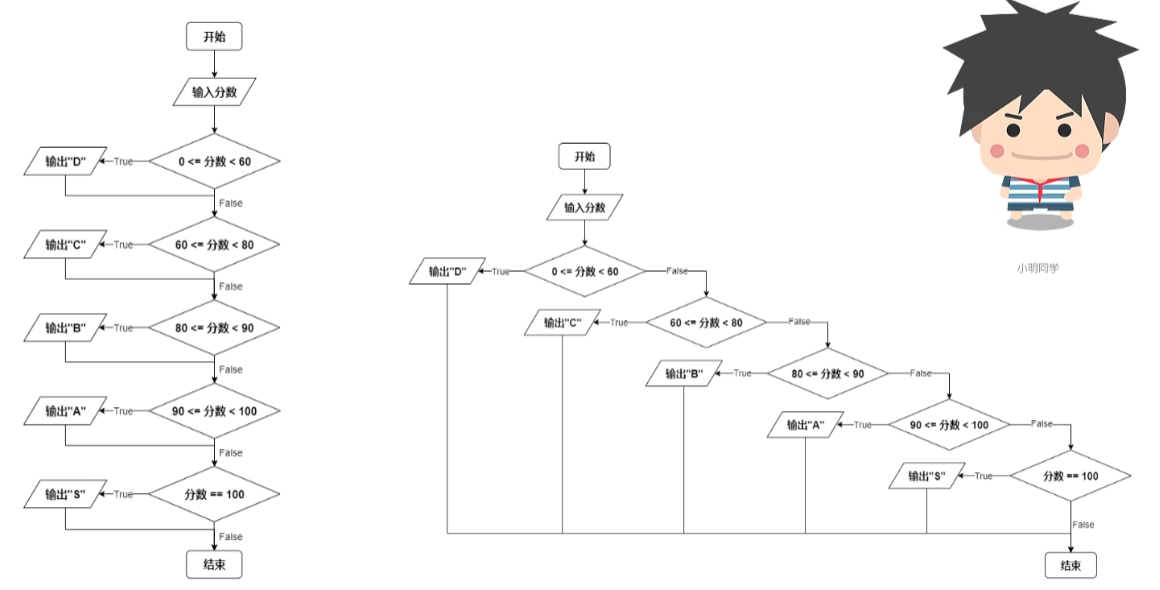
分支与循环 条件语句 1 2 3 4 5 6 7 8 9 10 11 12 13 14 15 16 17 18 19 20 21 22 23 24 25 if condition1: statements elif condition2: statements elif condition3: statements elif condition4: statements else : statements score = input ("请输入你的分数:" ) score = int (score) if 0 <= score <60 : print ("D" ) elif 60 <= score < 80 : print ("C" ) elif 80 <= score < 90 : print ("B" ) elif 90 <= score < 100 : print ("A" ) elif score == 100 : print ("S" ) else : print ("错误,请重新输入" )
嵌套:
1 2 3 4 5 6 if condition1: if condition2: statements else : else : statements
条件表达式 1 2 small = a if a < b else b
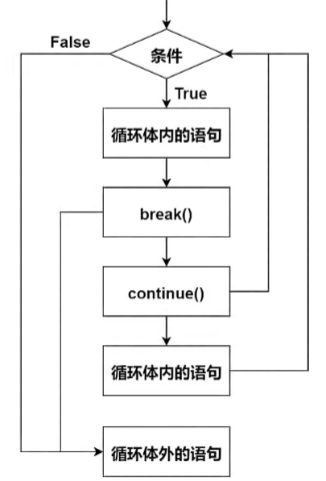
while 1 2 3 4 5 6 7 8 9 10 11 12 13 14 15 16 17 18 while condition: statements 无限循环 while True : statements while condition1: if condition2: break statements while i < 10 : i += 1 if i % 2 == 0 : continue print (i)
break 跳出一层循环体
continue 跳出本次循环,回到循环体开头
当循环条件不再为真时,else 语句才会被执行。用 break 语句跳出循环是仍为真,else 语句不会执行
1 2 3 4 5 6 7 8 9 i = 1 while i < 5 : print ("循环内,i的值是:" , i) if i == 2 : break i += 1 else : print ("循环外,i的值是:" , i)
for 1 2 3 4 5 6 7 8 9 10 for 变量 in 可迭代对象: statements for each in "Fishc" : print (each) i < 0 for i < len ("Fishc" ): print ("Fishc[i]" )
range(start, stop, step) ,[start, stop),step是步长
1 2 3 4 sum = 0 for i in range (100000 ): sum += i print (sum )
1 2 3 4 5 6 7 for n in range (2 ,100 ): for i in range (2 ,n//2 ): if n % i == 0 : print (n, "=" , i, "*" , n//i ) break else : print (n, "是一个素数" )
列表 列表的数据项不需要具有相同的类型
1 2 3 list = ['physics' , 'chemistry' , 1997 , 2000 , 3.14 , 3 + 4j , True ]for each in list : print (each)
索引:正值表示正序,负值表示逆序
1 2 3 4 5 6 7 list = ['physics' , 'chemistry' , 1997 , 2000 , 3.14 , 3 + 4j , True ]length = len (list ) i = 0 for i < length: print ("list[i]" ) print (list [-1 ])
切片
1 2 3 4 5 6 7 8 9 10 前三项 list [0 :3 ]list [:3 ]第三到六项 list [3 :6 ]list [3 :]步长 list [::2 ]list [::-2 ]
添加元素
1 2 3 list = ["Google" , "Bing" ]list .append("Baidu" )list [len (list ):]=[6 ,7 ,8 ,9 ]
extend() 的参数必须是一个可迭代对象,新的内容是追加到原列表最后一个元素后面
1 2 3 heros = ["钢铁侠" , "绿巨人" ] heros.extend(["黑寡妇" , "雷神" , "灭霸" ]) heros[len (heros):] = ["黑寡妇" , "雷神" , "灭霸" ]
插入元素
1 2 3 4 s = [1 , 3 , 4 , 5 ] s.insert(1 , 2 ) s.insert(0 , 0 ) s.insert(len (s), 6 )
删除元素
1 2 3 4 5 6 7 8 9 10 11 heros = ["黑寡妇" , "雷神" , "绿巨人" , "灭霸" , "灭霸" ] heros.remove("灭霸" ) heros.remove("123" ) heros.pop(0 ) heros.clear()
改变元素
1 2 3 heros = ["黑寡妇" , "雷神" , "绿巨人" , "鹰眼" , "灭霸" ] heros[4 ] = "钢铁侠" heros[3 :] = ["林冲" , "宋江" , "吴用" ]
排序
1 2 3 4 5 nums = [3 ,1 ,5 ,7 ,8 ,3 ,5 ,9 ] nums.sort() num.sort(reverse=True )
查
1 2 3 4 5 6 7 8 nums = [3 ,1 ,5 ,7 ,8 ,3 ,5 ,9 ,5 ] nums.count(5 ) index(x, start, end) heros.index("绿巨人" ) nums[nums.index(5 )] = 10 nums.index(5 , 6 , 7 )
浅拷贝
1 2 3 4 5 6 7 8 9 10 nums = [1 , 2 , 3 ] y = nums num[0 ] = 4 y [4 , 2 , 3 ] nums_copy1 = nums.copy() nums_copy2 = nums[:]
加法、乘法
1 2 3 4 5 6 7 8 9 10 11 12 13 s = [1 ,2 ,3 ] s [1 , 2 , 3 ] t=[4 ,5 ,6 ] t [4 , 5 , 6 ] s + t [1 , 2 , 3 , 4 , 5 , 6 ] s * 3 [1 , 2 , 3 , 1 , 2 , 3 , 1 , 2 , 3 ]
列表推导式 [expression for target in iterable if condition]
1 2 3 4 5 6 7 8 9 10 11 12 13 14 15 16 17 18 19 20 21 22 23 24 25 26 27 28 29 30 31 32 33 34 35 36 oho = [1 , 2 , 3 , 4 , 5 ] oho2 = [i * 2 for i in oho] oho2 [2 , 4 , 6 , 8 , 10 ] x = [i for i in range (10 )] x [0 , 1 , 2 , 3 , 4 , 5 , 6 , 7 , 8 , 9 ] y = [i + 1 for i in range (15 )] y [1 , 2 , 3 , 4 , 5 , 6 , 7 , 8 , 9 , 10 , 11 , 12 , 13 , 14 , 15 ] z = [s * 2 for s in "Meng" ] z ['MM' , 'ee' , 'nn' , 'gg' ] matrix = [[1 , 2 , 3 ], [4 , 5 , 6 ], [7 , 8 , 9 ]] col2 = [row[1 ] for row in matrix] col2 [2 , 5 , 8 ] diag = [matrix[i][i] for i in range (len (matrix))] diag [1 , 5 , 9 ] An_diag = [matrix[i][len (matrix) - i - 1 ] for i in range (len (matrix))] An_diag [3 , 5 , 7 ] even = [i for i in range (10 ) if i % 2 == 0 ] even [0 , 2 , 4 , 6 , 8 ] words = ["Great" , "Good" , "Fantistic" , "Finger" , "Excellent" ] fwords = [w for w in words if w[0 ] == "F" ] fwords ['Fantistic' , 'Finger' ]
嵌套列表推导式
1 2 3 4 [expression for target1 in iterable1 if condition1 for target2 in iterable2 if condition2 for target3 in iterable3 if condition3 for targetN in iterableN if conditionN]
1 2 3 4 5 6 7 8 9 10 11 12 13 14 15 16 17 18 19 20 21 matrix = [[1 , 2 , 3 ], [4 , 5 , 6 ], [7 , 8 , 9 ]] flatten = [col for row in matrix for col in row] flatten [1 , 2 , 3 , 4 , 5 , 6 , 7 , 8 , 9 ] A = [x + y for x in "BASKETBALL" for y in "basketball" ] A ['Bb' , 'Ba' , 'Bs' , 'Bk' , 'Be' , 'Bt' , 'Bb' , 'Ba' , 'Bl' , 'Bl' , 'Ab' , 'Aa' , 'As' , 'Ak' , 'Ae' , 'At' , 'Ab' , 'Aa' , 'Al' , 'Al' , 'Sb' , 'Sa' , 'Ss' , 'Sk' , 'Se' , 'St' , 'Sb' , 'Sa' , 'Sl' , 'Sl' , 'Kb' , 'Ka' , 'Ks' , 'Kk' , 'Ke' , 'Kt' , 'Kb' , 'Ka' , 'Kl' , 'Kl' , 'Eb' , 'Ea' , 'Es' , 'Ek' , 'Ee' , 'Et' , 'Eb' , 'Ea' , 'El' , 'El' , 'Tb' , 'Ta' , 'Ts' , 'Tk' , 'Te' , 'Tt' , 'Tb' , 'Ta' , 'Tl' , 'Tl' , 'Bb' , 'Ba' , 'Bs' , 'Bk' , 'Be' , 'Bt' , 'Bb' , 'Ba' , 'Bl' , 'Bl' , 'Ab' , 'Aa' , 'As' , 'Ak' , 'Ae' , 'At' , 'Ab' , 'Aa' , 'Al' , 'Al' , 'Lb' , 'La' , 'Ls' , 'Lk' , 'Le' , 'Lt' , 'Lb' , 'La' , 'Ll' , 'Ll' , 'Lb' , 'La' , 'Ls' , 'Lk' , 'Le' , 'Lt' , 'Lb' , 'La' , 'Ll' , 'Ll' ] B = [[x ,y] for x in range (10 ) if x % 2 == 0 for y in range (10 ) if y % 3 == 0 ] B [[0 , 0 ], [0 , 3 ], [0 , 6 ], [0 , 9 ], [2 , 0 ], [2 , 3 ], [2 , 6 ], [2 , 9 ], [4 , 0 ], [4 , 3 ], [4 , 6 ], [4 , 9 ], [6 , 0 ], [6 , 3 ], [6 , 6 ], [6 , 9 ], [8 , 0 ], [8 , 3 ], [8 , 6 ], [8 , 9 ]] _ = [] for x in range (10 ): if x % 2 == 0 : for y in range (10 ): if y % 3 == 0 : _.append([x ,y])
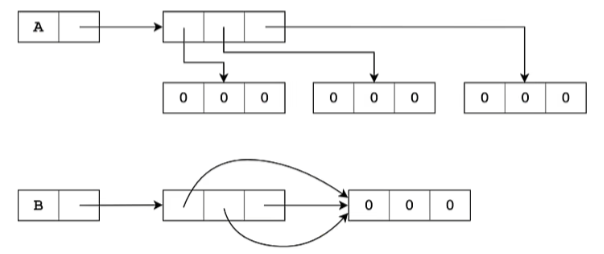
嵌套列表 乘法
1 2 3 4 5 6 7 8 9 10 11 12 13 14 15 16 17 18 19 20 21 22 23 24 matrix = [[1 , 2 , 3 ], [4 , 5 , 6 ], [7 , 8 , 9 ]] for i in matrix: for j in i: print (j, end=" " ) print () matrix[0 ][0 ] matrix[1 ][2 ] B = [[0 ] * 3 ] * 3 B[1 ][1 ] = 1 B [[0 , 1 , 0 ], [0 , 1 , 0 ], [0 , 1 , 0 ]] lists = [[]] * 3 lists[0 ].append(3 ) lists [[3 ], [3 ], [3 ]] for i in range (3 ): A[i] = [0 ] * 3 A = [[0 ] * 3 for i in range (3 )]
深拷贝
1 2 3 4 5 6 7 8 9 10 11 12 x = [[1 , 2 , 3 ], [4 , 5 , 6 ], [7 , 8 , 9 ]] y = x.copy() x[1 ][1 ] = 0 y [[1 , 2 , 3 ], [4 , 0 , 6 ], [7 , 8 , 9 ]] import copyy = copy.copy(x) y = copy.deepcopy(x)
元组 1 2 3 4 5 6 7 8 9 10 11 12 13 14 15 16 17 18 19 20 21 22 23 24 25 26 27 28 29 30 31 32 33 34 35 36 37 38 39 40 41 42 43 44 45 46 47 48 49 50 51 52 53 54 55 56 57 58 59 60 61 62 63 64 65 66 67 68 69 70 71 72 73 74 75 76 77 rhyme = (1 , 2 , 3 , 4 , 5 , "fish" ) rhyme (1 , 2 , 3 , 4 , 5 , 'fish' ) rhyme[0 ] 1 rhyme[-1 ] 'fish' rhyme[:3 ] (1 , 2 , 3 ) rhyme[2 :] (3 , 4 , 5 , 'fish' ) rhyme[::2 ] (1 , 3 , 5 ) rhyme[::-1 ] ('fish' , 5 , 4 , 3 , 2 , 1 ) heros = ["蜘蛛侠" , "绿巨人" , "黑寡妇" ] heros.index("黑寡妇" ) 2 s = (1 , 2 , 3 ) t = (4 , 5 , 6 ) s + t (1 , 2 , 3 , 4 , 5 , 6 ) s * 3 (1 , 2 , 3 , 1 , 2 , 3 , 1 , 2 , 3 ) w = (s, t) w ((1 , 2 , 3 ), (4 , 5 , 6 )) x = (520 ,) t = (123 , "fish" , 3.14 ) x, y, z = t x 123 y 'fish' z 3.14 a, b, *c = "fish" a 'f' b 'i' c ['s' , 'h' ] rhyme[1 ] = 10 Traceback (most recent call last): File "<pyshell#4>" , line 1 , in <module> rhyme[1 ] = 10 TypeError: 'tuple' object does not support item assignment s = [1 , 2 , 3 ] t = [4 , 5 , 6 ] w = (s, t) w ([1 , 2 , 3 ], [4 , 5 , 6 ]) w[0 ][0 ] = 0 w ([0 , 2 , 3 ], [4 , 5 , 6 ])
字符串 在 Python 中,字符串是不可变的序列,可以使用多种内置函数和方法来操作字符串。以下是 Python 字符串的一些常用函数和方法的总结:
字符串创建
字符串基本操作
len(s): 返回字符串 s 的长度。s[index]: 访问字符串 s 中的第 index 个字符(从 0 开始)。
字符串方法 大小写 :
s.lower(): 将字符串转换为小写。s.upper(): 将字符串转换为大写。s.title(): 将字符串的每个单词的首字母转换为大写。s.capitalize(): 将字符串的首字母转换为大写。s.swapcase(): 将字符串中的大写字母转换为小写字母,反之亦然。s.casefold(): 用于将字符串转换为小写,与 lower() 方法不同,casefold() 更加严格,特别是在处理某些语言的字符时1 2 3 4 5 6 7 8 9 10 11 12 13 s = "I love Python" s.lower() 'i love python' s.upper() 'I LOVE PYTHON' s.title() 'I Love Python' s.capitalize() 'I love python' s.swapcase() 'i LOVE pYTHON' s.casefold() 'i love python'
左中右对齐 :默认用空格填充
s.center(width, fillchar=''): 返回一个居中对齐的字符串,使用 fillchar 填充到指定的 widths.ljust(width, fillchar=''): 返回一个左对齐的字符串,使用指定的填充字符填充到指定的宽度 widths.rjust(width, fillchar=''): 返回一个右对齐的字符串,使用指定的填充字符填充到指定的宽度 widths.zfill(width): 返回一个字符串,前面填充零 (0) 直到达到指定的宽度 width,并且如果字符串是负数,负号会在零的前面。一般用于数据报表1 2 3 4 5 6 7 8 9 10 11 12 13 14 15 16 17 18 19 20 21 22 23 s = "有内鬼,终止交易!" s '有内鬼,终止交易!' len (s)9 s.center(15 ) ' 有内鬼,终止交易! ' s.ljust(15 ) '有内鬼,终止交易! ' s.rjust(15 ) ' 有内鬼,终止交易!' s.zfill(15 ) '000000有内鬼,终止交易!' s.center(15 , "淦" ) '淦淦淦有内鬼,终止交易!淦淦淦' s.ljust(15 , "淦" ) '有内鬼,终止交易!淦淦淦淦淦淦' s.rjust(15 , "淦" ) '淦淦淦淦淦淦有内鬼,终止交易!'
查找
s.find(sub, start, end): 返回子串 sub 在字符串中的最低索引,未找到返回 -1。s.rfind(sub, start, end): 从右侧开始查找子串 sub 的最低索引,未找到会引发 ValueError。s.index(sub, start, end): 返回子串 sub 在字符串中的最低索引,未找到会引发 ValueError。s.rindex(sub, start, end): 从右侧开始查找子串 sub 的最低索引,未找到会引发 ValueError。s.count(sub, start, end): 计算子串 sub 在字符串中出现的次数。1 2 3 4 5 6 7 8 9 10 11 12 13 14 15 s = "上海自来水来自海上" s.count("海" ) 2 s.count("海" , 0 , 5 ) 1 s.find("海" ) 1 s.rfind("海" ) 7 s.index("海" ) 1 s.rindex("海" ) 7 s.find("贵" ) -1
替换
s.expandtabs(tabsize=8): 返回一个字符串,将字符串中的所有制表符 (\t) 替换为适当数量的空格,默认情况下每个制表符占 8 个空格,可以通过 tabsize 参数指定其他的空格数。
s.replace(old, new, count=-1): 返回一个新字符串,替换字符串 s 中的所有子字符串 old 为 new。count 参数指定替换的最大次数,默认为 -1,表示替换所有出现的 old。
s.translate(table): 返回一个新字符串,其中的字符根据给定的字符映射表 table 进行替换。该 table 通常是通过 str.maketrans() 创建的,用于定义要替换的字符及其对应的替换字符。
1 2 3 4 5 6 7 8 9 10 11 12 13 14 15 16 17 code = """ print("I love Python") print("I love Python") """ newcode = code.expandtabs(8 ) print (newcode) print ("I love Python" ) print ("I love Python" ) s = "I love Python" s.replace("love" , "hate" ) 'I hate Python' s.translate(str .maketrans("OPQ" , "123" )) 'I love 2ython'
判断
s.startswith(prefix, start, end): 检查字符串是否以 prefix 开头。s.endswith(suffix, start, end): 检查字符串是否以 suffix 结尾。s.islower(): 如果字符串中至少有一个字符且所有字符都是小写,则返回 True。s.isupper(): 如果字符串中至少有一个字符且所有字符都是大写,则返回 True。s.isalnum(): 如果字符串至少有一个字符并且所有字符都是字母或数字,则返回 True。s.isalpha(): 如果字符串至少有一个字符并且所有字符都是字母,则返回 True。s.isascii(): 如果字符串中的所有字符都是 ASCII 字符,则返回 True。s.isdecimal(): 如果字符串只包含十进制字符(即数字字符),并且至少有一个字符,则返回 True。十进制字符包括 0-9。s.isdigit(): 如果字符串只包含数字字符,则返回 True。s.isnumeric(): 如果字符串只包含数字字符,则返回 True。s.isdentifier(): 如果字符串是一个有效的标识符(符合 Python 的标识符规则),则返回 True。有效的标识符必须以字母或下划线开头,后续字符可以是字母、数字或下划线。s.isprintable(): 如果字符串是可打印的,则返回 True。s.isspace(): 如果字符串只包含空白字符,则返回 True。s.istitle(): 如果字符串是标题格式(每个单词的首字母大写),则返回 True。1 2 3 4 5 6 7 8 9 10 11 12 13 14 15 16 17 18 19 20 21 22 23 24 25 26 27 28 29 30 31 32 33 34 35 36 37 38 39 40 41 42 43 44 45 46 47 48 49 50 51 52 53 54 55 56 57 s = "我爱Python" s.startswith("我" ) True s.startswith("他" ) False s.endswith("Python" ) True s. endswith("Py" ) False s.startswith("我" , 1 ) False s.startswith("爱" , 1 ) True s.endswith("Py" , 0 , 4 ) True x = "她爱Python" if x.startswith(("我" , "他" , "她" )): print ("总有人喜欢Pyhon" ) 总有人喜欢Pyhon s = "I love Python" s.istitle() False s.isupper() False s.upper().isupper() True s.isalpha() False " \n" .isspace()True "I love Python\n" .isprintable()False s = "I love Python" s.istitle() False s.isupper() False s.upper().isupper() True s.isalpha() False " \n" .isspace()True "I love Python\n" .isprintable() False import keywordkeyword.iskeyword("if" ) True keyword.iskeyword("while" ) True keyword.iskeyword("py" ) False
截取
s.strip(): 去除字符串两端的空白字符。s.lstrip(): 去除字符串左端的空白字符。s.rstrip(): 去除字符串右端的空白字符。s.removeprefix(prefix): 返回一个新字符串,如果字符串 s 以指定的前缀 prefix 开头,则移除该前缀;否则返回原字符串。s.removesuffix(prefix): 返回一个新字符串,如果字符串 s 以指定的后缀 suffix 结尾,则移除该后缀;否则返回原字符串。1 2 3 4 5 6 7 8 9 10 11 12 13 14 15 16 " 左侧不要留白" .lstrip()'左侧不要留白' "右侧不要留白 " .rstrip()'右侧不要留白' " 两侧不要留白 " .strip()'两侧不要留白' "www.mengkr.asia" .lstrip("wcom." )'engkr.asia' "www.mengkr.asia" .rstrip("wcom." )'www.mengkr.asia' "www.mengkr.asia" .strip("wcom." )'engkr.asia' "www.mengkr.asia" .removeprefix("www." )'mengkr.asia' "www.mengkr.asia" .removesuffix(".asia" )'www.mengkr'
分割
s.split(sep=None, maxsplit=-1): 将字符串 s 按照指定的分隔符 sep 进行分割,返回一个列表。maxsplit 参数指定最大分割次数,默认为 -1,表示分割所有。s.rsplit(sep=None, maxsplit=-1): 从右侧开始分割字符串 s,与 split() 方法类似,返回一个列表。s.splitlines(keepends=False): 将字符串 s 按照行分割(解决不同操作系统换行符不同的问题),返回一个列表。keepends 参数如果为 True,则保留换行符。s.partition(sep): 将字符串 s 按照指定的分隔符 sep 分割为三部分:分隔符前的部分、分隔符本身和分隔符后的部分,返回一个包含这三部分的元组。s.rpartition(sep): 从右侧开始分割字符串 s,与 partition() 方法类似,返回一个包含三部分的元组。s.join(iterable): 将可迭代对象中的字符串连接成一个字符串。
1 2 3 4 5 6 7 8 9 10 11 12 13 14 15 16 17 18 19 20 21 22 23 24 25 26 27 28 29 30 31 32 33 34 35 36 37 38 39 40 41 42 43 44 "www.mengkr.asia" .partition("." )('www' , '.' , 'mengkr.asia' ) "www.mengkr.asia/python" .rpartition("/" )('www.mengkr.asia' , '/' , 'python' ) "苟日新,日日新,又日新" .split("," )['苟日新,日日新,又日新' ] "苟日新,日日新,又日新" .split("," )['苟日新' , '日日新' , '又日新' ] "苟日新,日日新,又日新" .rsplit("," )['苟日新' , '日日新' , '又日新' ] "苟日新,日日新,又日新" .split("," , 1 )['苟日新' , '日日新,又日新' ] "苟日新,日日新,又日新" .rsplit("," , 1 )['苟日新,日日新' , '又日新' ] "苟日新\r日日新\r\n又日新" .splitlines()['苟日新' , '日日新' , '又日新' ] "苟日新\n日日新\r\n又日新" .splitlines()['苟日新' , '日日新' , '又日新' ] "苟日新\r日日新\r\n又日新" .splitlines(True )['苟日新\r' , '日日新\r\n' , '又日新' ] "." .join(["www" , "mengkr" , "asia" ])'www.mengkr.asia' "^" .join(["www" , "mengkr" , "asia" ])'www^mengkr^asia' s = "FishC" s += s s 'FishCFishC' "" .join(["FishC" , "FishC" ])'FishCFishC'
格式化字符串
str.format(): 格式化字符串。f"{}": 使用 f-string 进行格式化(Python 3.6+)。s.format_map(mapping): 使用字典 mapping 格式化字符串。
基本格式化
位置和关键字参数
{name}:根据关键字引用参数。
格式说明符 在大括号内,可以使用冒号 : 后跟格式说明符来控制输出格式:
类型 :
d:整数(十进制)。f:浮点数,默认精度为6。**F**:表示浮点数的格式,类似于 f,默认精度为6,但在输出时总是使用科学计数法(例如,1.23E+02)。
s:字符串。x:十六进制整数(小写)。X:十六进制整数(大写)。b:二进制整数。o:八进制整数。e:科学计数法(小写)。E:科学计数法(大写)。g:通用格式,根据值选择 f 或 e 格式,小数以f形式输出,大数以e形式输出**G**:通用格式,表示浮点数的格式,自动选择 F 或科学计数法(E)格式,具体取决于数值的大小和精度。例如,如果数值较大或较小,则会使用科学计数法;否则,使用普通的浮点数格式。
**%**:用于表示百分比。将数值乘以 100 并添加 % 符号。例如,{:.2%} 将格式化为百分比形式,并保留两位小数。
**None**:在格式化字符串中,None 本身不会有特定的格式说明符。如果你在格式化时传入 None,会被转换为字符串 'None'。例如,print("Value: {}".format(None)) 将输出 Value: None。
宽度 :
{:<10}:左对齐,宽度为 10。{:>10}:右对齐,宽度为 10。{:^10}:居中对齐,宽度为 10。{:.2f}:浮点数保留两位小数。
填充 :
{:0=10}:用0填充,宽度为 10。只对数字有效,感知正负号{:_<10}:用下划线填充左对齐,宽度为 10。{:.^10}:用点填充居中对齐,宽度为 10。
千位分隔符 :
{:,}:使用逗号作为千位分隔符。{:_}:使用下划线作为千位分隔符。
示例 以下是一些使用格式化选项的示例:
1 2 3 4 5 6 7 8 9 10 11 12 13 14 15 16 17 18 19 20 21 22 23 24 25 26 27 28 29 30 31 32 33 34 35 36 37 38 39 40 41 42 43 44 45 46 47 48 49 50 51 52 53 54 55 56 57 58 59 60 61 62 63 64 65 66 67 68 69 70 71 72 73 74 75 76 77 78 79 80 81 82 83 84 85 86 87 88 89 90 91 92 93 94 95 96 97 98 99 100 101 102 103 104 105 106 107 108 109 name = "Alice" age = 30 height = 5.6789 "Name: {}" .format (name)'Name: Alice' "Age: {}" .format (age)'Age: 30' "Name: {0}, Age: {1}" .format (name, age)'Name: Alice, Age: 30' "Name: {name}, Age: {age}" .format (name=name, age=age)'Name: Alice, Age: 30' "{}, {}, {}" .format (1 , "{}" , 2 )'1, {}, 2' "{}, {{}}, {}" .format (1 , 2 )'1, {}, 2' "{:+} {:-}" .format (520 , -250 )'+520 -250' "Age: {:>5}" .format (age) 'Age: 30' "{1:>10}{0:<10}" .format (520 , 250 ) ' 250520 ' "{:0=10}" .format (520 ) '0000000520' "{:0=10}" .format (-520 ) '-000000520' "Height: {:.2f}" .format (height) 'Height: 5.68' "{:.2g}" .format (3.1415 )'3.1' "{:.6}" .format ("I love Pyhthon" )'I love' "{:,}" .format (1234 )'1,234' "{:_}" .format (1234 )'1_234' "{:,}" .format (123 )'123' "Formatted number: {:,}" .format (1000000 )'Formatted number: 1,000,000' "{:b}" .format (80 )'1010000' "{:#b}" .format (80 )'0b1010000' "{:#d}" .format (80 )'80' "{:#o}" .format (80 )'0o120 "{:#x}".format(80) ' 0x50 ' # 科学计数法 "{:e}".format(3.1415) ' 3.141500e+00 ' "{:E}".format(3.1415) ' 3.141500E+00 ' # 通过关键字设置 "{:.{prec}f}".format(3.1415, prec=2) ' 3.14 ' "{:{fill}{align}{width}.{prec}{ty}}".format(3.1415, fill=' +', align=' ^', width=10, prec=3, ty=' g') ' +++3.14 +++' # 其他 "{:f}".format(3.1415) "{:g}".format(1234.56789) ' 1234.57 ' "{:g}".format(123456789) ' 1.23457e+08 ' "{:%}".format(0.98) ' 98.000000 %' "{:.2%}".format(0.98) ' 98.00 %'
f-字符串(python3.6以上) 可以看作 format 方法的语法糖
1 2 3 4 5 6 7 8 9 10 11 f"1+2={1 +2 } ,2的平方是{2 *2 } " '1+2=3,2的平方是4' f"{-520 :0 10} " '-000000520' f"{123456789 :,} " '123,456,789' f"{3.1415 :.2 f} " '3.14'
字符串编码和解码
s.encode(encoding): 将字符串编码为字节。b.decode(encoding): 将字节解码为字符串。
序列 列表、元组和字符串都为序列。列表为可变序列,元组和字符串则是不可变序列。
迭代器与迭代对象 一个迭代器肯定是一个迭代对象,可迭代对象可以重复使用而迭代器是一次性的
可迭代对象 vs 迭代器
概念
要求
示例
可迭代对象
实现 __iter__
list, tuple, dict
迭代器
实现 __iter__ 和 __next__
file对象, generator
可迭代对象 :可以被迭代的对象(可以不是迭代器本身)迭代器 :实际执行迭代的对象(必须也是可迭代对象)
1 2 3 4 5 6 7 8 9 10 11 12 13 14 15 16 17 18 19 20 21 22 23 24 25 26 27 28 29 30 31 32 mapped = map (ord , "FishC" ) for each in mapped: print (each) 70 105 115 104 67 list (mapped)[] x = [1 , 2 , 3 , 4 , 5 ] y = iter (x) type (x)<class 'list' > type (y)<class 'list_iterator' > next (y, "已经掏空了" )1 next (y, "已经掏空了" )2 next (y, "已经掏空了" )3 next (y, "已经掏空了" )4 next (y, "已经掏空了" )5 next (y, "已经掏空了" )'已经掏空了'
方法 id id() 函数用于返回对象的唯一标识符(ID)。这个标识符是一个整数,代表对象在内存中的地址。具体来说,id() 函数的返回值具有以下特点:
唯一性 :对于一个对象,id() 返回的值在其生命周期内是唯一的。也就是说,在对象存在的期间,id() 返回的值不会改变。内存地址 :id() 返回的整数值通常是对象在内存中的地址(在 CPython 实现中),但这个值并不一定是直接可用的内存地址。对象的生命周期 :当对象被销毁后,id() 返回的值可能会被其他对象重新使用。
is 和 is not 是用于比较对象身份的运算符。用于判断两个对象是否是同一个对象(即内存地址是否相同)。下面是详细说明和使用示例:
1 2 3 4 5 6 7 8 9 10 11 12 13 s = [1 , 2 , 3 ] id (s)2647838351424 s *= 2 id (s)2647838351424 t = (1 , 2 , 3 ) id (t)2647838478144 t *= 2 id (t)2647833158912
is 运算符
作用 :判断两个对象是否是同一个对象。换句话说,检查两个变量是否引用同一个内存地址。返回值 :如果两个对象是同一个对象,返回 True;否则返回 False。
is not 运算符
作用 :判断两个对象是否不是同一个对象。是 is 的否定形式。返回值 :如果两个对象不是同一个对象,返回 True;否则返回 False。
in 和 not in 是用于检查某个元素是否存在于可迭代对象(如列表、元组、字符串、字典等)中的运算符。具体用法和功能如下:
1 2 3 4 5 6 7 8 9 x = "Meng" y = "Meng" x is y True x = [1 , 2 , 3 ] y = [1 , 2 , 3 ] x is y False
in 运算符
作用 :检查一个元素是否存在于指定的可迭代对象中。返回值 :如果元素存在,返回 True;否则返回 False。
not in 运算符
作用 :检查一个元素是否不存在于指定的可迭代对象中。返回值 :如果元素不存在,返回 True;否则返回 False。
1 2 3 4 5 "M" in "Meng" True "M" not in "Meng" False
del 的用法
删除变量 :可以使用 del 删除一个变量,使其不再引用任何对象。删除列表中的元素 :可以使用 del 删除列表中的特定元素或切片。删除字典中的键 :可以使用 del 删除字典中的特定键及其对应的值。删除对象的属性 :可以使用 del 删除对象的某个属性。
1 2 3 4 5 6 7 8 9 10 11 12 13 14 15 16 17 18 19 20 21 x = "Well" y = [1 , 2 , 3 ] del x, yx = [1 , 2 , 3 , 4 , 5 ] del x[1 :4 ][1 , 5 ] y = [1 , 2 , 3 , 4 , 5 ] y[1 :4 ] = [] [1 , 5 ] x = [1 , 2 , 3 , 4 , 5 ] del x[::2 ] [2 , 4 ] x.clear() del x[::]
min() 函数
作用 :返回可迭代对象中的最小值。
语法 :
1 min (iterable, *[, key, default])
iterable:要查找最小值的可迭代对象。key:可选参数,一个函数,用于从每个元素中提取比较值。default:可选参数,当可迭代对象为空时返回的默认值。
max() 函数
作用 :返回可迭代对象中的最大值。
语法 :
1 max (iterable, *[, key, default])
iterable:要查找最大值的可迭代对象。key:可选参数,一个函数,用于从每个元素中提取比较值。default:可选参数,当可迭代对象为空时返回的默认值。
1 2 s = [] min (s, default="列表没有内容" )
len() 函数
作用 :返回对象(如字符串、列表、元组、字典等)的长度或元素个数。
1 2 3 4 5 6 7 8 9 10 11 12 13 14 15 16 17 18 19 my_string = "Hello, world!" string_length = len (my_string) print ("字符串长度:" , string_length) my_list = [1 , 2 , 3 , 4 , 5 ] list_length = len (my_list) print ("列表长度:" , list_length) my_dict = {'name' : 'Alice' , 'age' : 30 , 'city' : 'New York' } dict_length = len (my_dict) print ("字典长度:" , dict_length) my_tuple = (1 , 2 , 3 ) tuple_length = len (my_tuple) print ("元组长度:" , tuple_length)
sum() 函数1 2 3 4 5 6 7 8 9 10 11 12 13 14 15 16 17 sum (iterable, start=0 )numbers = [1 , 2 , 3 , 4 , 5 ] total_sum = sum (numbers) print ("总和:" , total_sum) numbers_tuple = (10 , 20 , 30 ) total_sum_tuple = sum (numbers_tuple) print ("元组的总和:" , total_sum_tuple) total_sum_with_start = sum (numbers, 10 ) print ("总和(从 10 开始):" , total_sum_with_start)
sorted() 函数1 2 3 4 words = ['apple' , 'banana' , 'cherry' , 'date' ] sorted_by_length = sorted (words, key=len ) print ("按长度排序:" , sorted_by_length)
reversed() 函数1 2 3 4 5 6 7 8 9 10 11 s = [1 , 2 , 5 , 8 , 0 ] reversed (s)<list_reverseiterator object at 0x000002687EC8B460 > list (reversed (s)) [0 , 8 , 5 , 2 , 1 ] my_string = "Hello" reversed_string = '' .join(reversed (my_string)) print ("反转后的字符串:" , reversed_string)
all() 函数any() 函数1 2 3 4 5 6 7 8 9 10 x = [1 , 1 , 0 ] all (x)False y = [1 , 1 , 9 ] all (x)True any (x)True any (x)True
enumerate() 函数1 2 3 4 5 6 7 8 9 10 11 12 13 14 15 16 17 18 19 20 fruits = ['apple' , 'banana' , 'cherry' ] for index, fruit in enumerate (fruits): print (index, fruit) for index, fruit in enumerate (fruits, start=1 ): print (index, fruit) enumerated_fruits = list (enumerate (fruits)) print ("枚举后的列表:" , enumerated_fruits)
zip() 函数1 2 3 4 5 6 7 8 9 10 11 12 13 14 15 16 17 18 19 20 21 22 23 24 names = ['Alice' , 'Bob' , 'Charlie' ] scores = [85 , 90 , 95 ] zipped = zip (names, scores) for name, score in zipped: print (name, score) zipped_list = list (zip (names, scores)) print ("打包后的列表:" , zipped_list) names = ['Alice' , 'Bob' ] scores = [85 , 90 , 95 ] zipped_diff_length = list (zip (names, scores)) print ("不同长度的打包结果:" , zipped_diff_length)
map() 函数1 2 3 4 5 6 7 8 9 10 11 12 13 14 15 16 17 18 19 20 21 22 mapped = map (ord , "FishC" ) list (mapped)[70 , 105 , 115 , 104 , 67 ] list (map (max , [1 , 3 , 5 ], [2 , 3 , 8 ], [0 , 3 , 10 , 9 ]))[2 , 3 , 10 ] numbers = [1 , 2 , 3 , 4 , 5 ] squared_numbers = map (lambda x: x * x, numbers) squared_list = list (squared_numbers) print ("平方后的列表:" , squared_list) numbers1 = [1 , 2 , 3 ] numbers2 = [4 , 5 , 6 ] summed_numbers = map (lambda x, y: x + y, numbers1, numbers2) summed_list = list (summed_numbers) print ("相加后的列表:" , summed_list)
filter() 函数1 2 3 4 5 6 7 8 9 10 11 12 13 14 15 16 17 18 19 20 21 22 23 24 def is_even (n ): return n % 2 == 0 numbers = [1 , 2 , 3 , 4 , 5 , 6 ] even_numbers = filter (is_even, numbers) even_numbers_list = list (even_numbers) print ("偶数列表:" , even_numbers_list) numbers = [1 , 2 , 3 , 4 , 5 , 6 ] even_numbers = filter (lambda x: x % 2 == 0 , numbers) even_numbers_list = list (even_numbers) print ("偶数列表:" , even_numbers_list) strings = ["apple" , "" , "banana" , None , "cherry" , " " ] filtered_strings = filter (lambda s: s and s.strip(), strings) filtered_strings_list = list (filtered_strings) print ("非空字符串列表:" , filtered_strings_list)
转换 列表与元组之间的转换
列表转换为元组 :使用 tuple() 函数。元组转换为列表 :使用 list() 函数。
示例 1 2 3 4 5 6 7 8 9 my_list = [1 , 2 , 3 , 4 , 5 ] my_tuple = tuple (my_list) print (my_tuple) my_tuple = (1 , 2 , 3 , 4 , 5 ) my_list = list (my_tuple) print (my_list)
列表与字符串之间的转换
列表转换为字符串 :使用 join() 方法。字符串转换为列表 :使用 split() 方法。
示例 1 2 3 4 5 6 7 8 9 my_list = ['Hello' , 'world' , 'Python' ] my_string = ' ' .join(my_list) print (my_string) my_string = "Hello world Python" my_list = my_string.split() print (my_list)
元组与字符串之间的转换
元组转换为字符串 :使用 join() 方法(需要先将元组转换为列表或直接使用字符串)。字符串转换为元组 :使用 tuple() 函数。
示例 1 2 3 4 5 6 7 8 9 my_tuple = ('H' , 'e' , 'l' , 'l' , 'o' ) my_string = '' .join(my_tuple) print (my_string) my_string = "Hello" my_tuple = tuple (my_string) print (my_tuple)
可哈希性 可哈希性(Hashable)是Python中一个重要的概念,决定了对象能否作为字典的键或集合的元素
可哈希对象的特点:
不可变性 :大多数Python的不可变对象都是可哈希的
数字类型:int, float, decimal.Decimal, fractions.Fraction
字符串:str
元组:tuple(只有当包含的所有元素都是可哈希的)
冻结集合:frozenset
自定义类 :默认情况下,用户定义的类的实例是可哈希的
哈希值基于对象ID
如果定义了__eq__()方法,默认的__hash__()会被设置为None,除非显式定义
不可哈希对象:
可变容器:list, dict, set
包含可变元素的元组
自定义类(如果定义了__eq__()但没有定义__hash__())
检查对象是否可哈希:
1 2 3 4 5 6 7 8 9 10 11 12 13 14 from collections.abc import Hashabledef check_hashability (obj ): if isinstance (obj, Hashable): try : hash (obj) return True except TypeError: return False return False print (check_hashability(42 )) print (check_hashability("hello" )) print (check_hashability([1 , 2 ]))
字典 字典是python中唯一实现映射关系的内置类型
创建字典 1 2 3 4 5 6 7 a = {"刘备" :"左将军" , "关羽" :"汉寿亭侯" , "吕布" :"平东将军" } b = dict (刘备="左将军" , 关羽="汉寿亭侯" , 吕布="平东将军" ) c = dict ([("刘备" , "左将军" ), ("关羽" , "汉寿亭侯" ), ("吕布" , "平东将军" )]) d = dict (zip (["刘备" , "关羽" , "吕布" ], ["左将军" , "汉寿亭侯" , "平东将军" ])) a == b == c == d True
查/访问 1 2 3 4 5 6 value = my_dict['name' ] value = my_dict.get('name' ) value = my_dict.get('name' , 'default' ) my_dict.setdefault('key' , 'default_value' )
添加/修改元素 1 2 my_dict['new_key' ] = 'new_value' my_dict.update({'key1' : 'val1' , 'key2' : 'val2' })
删除元素 1 2 3 4 5 del my_dict['key' ] value = my_dict.pop('key' ) value = my_dict.pop('key' , 'default' ) my_dict.popitem() my_dict.clear()
拷贝 1 new_dict = my_dict.copy()
映射到相同的值 1 2 3 4 5 6 7 dict .fromkeys(iterable[, value])keys = ['name' , 'age' , 'gender' ] new_dict = dict .fromkeys(keys, 'unknown' ) print (new_dict)
字典视图 1 2 3 4 5 6 7 8 9 10 11 12 13 14 15 16 17 18 19 20 21 22 keys = my_dict.keys() values = my_dict.values() items = my_dict.items() my_dict = {"刘备" :"左将军" , "关羽" :"汉寿亭侯" , "吕布" :"平东将军" } keys = my_dict.keys() values = my_dict.values() items = my_dict.items() keys dict_keys(['刘备' , '关羽' , '吕布' ]) values dict_values(['左将军' , '汉寿亭侯' , '平东将军' ]) items dict_items([('刘备' , '左将军' ), ('关羽' , '汉寿亭侯' ), ('吕布' , '平东将军' )]) my_dict.pop("吕布" ) '平东将军' keys dict_keys(['刘备' , '关羽' ]) values dict_values(['左将军' , '汉寿亭侯' ]) items dict_items([('刘备' , '左将军' ), ('关羽' , '汉寿亭侯' )])
嵌套 1 2 3 4 5 6 7 8 9 10 11 12 13 14 15 16 17 18 19 20 21 22 23 24 25 26 27 28 29 30 31 32 33 34 person = { 'name' : 'Alice' , 'age' : 30 , 'address' : { 'street' : '123 Main St' , 'city' : 'New York' , 'zip' : '10001' }, 'contacts' : { 'email' : 'alice@example.com' , 'phone' : '555-1234' } } company = {} company['name' ] = 'Tech Corp' company['departments' ] = {} company['departments' ]['engineering' ] = {'employees' : 50 , 'manager' : 'Bob' } company['departments' ]['marketing' ] = {'employees' : 20 , 'manager' : 'Alice' } print (person['name' ]) print (person['address' ]['city' ]) print (company['departments' ]['engineering' ]['manager' ]) city = person.get('address' , {}).get('city' , 'Unknown' ) print (city) d = {"小明" :[60 , 70 , 80 ], "小红" :[90 , 100 , 110 ]} d["小明" ][1 ] 70
字典推导式 1 2 3 4 5 6 7 8 9 10 11 12 13 14 15 16 17 18 19 20 21 22 {key_expression: value_expression for item in iterable} {key_expression: value_expression for item in iterable if condition} numbers = [1 , 2 , 3 , 4 ] squared_dict = {x: x**2 for x in numbers} numbers = [1 , 2 , 3 , 4 , 5 ] even_squares = {x: x**2 for x in numbers if x % 2 == 0 } word = "hello" letter_counts = {letter: word.count(letter) for letter in word} original = {'a' : 1 , 'b' : 2 , 'c' : 3 } inverted = {v: k for k, v in original.items()} matrix = [[1 , 2 ], [3 , 4 ], [5 , 6 ]] flattened = {i+1 : row[i] for i in range (2 ) for row in matrix}
错误示例 1 2 3 4 5 6 7 8 9 10 11 12 13 14 15 16 17 18 19 20 21 {x:y for x in [1 , 3 , 5 ] for y in [2 , 4 , 6 ]} {1 : 6 , 3 : 6 , 5 : 6 } 这是因为字典推导式中的嵌套循环工作原理: 外层循环 for x in [1 , 3 , 5 ] 会依次取 1 , 3 , 5 对于每个x值,内层循环 for y in [2 , 4 , 6 ] 会完整地遍历一遍 [2 , 4 , 6 ] 字典的键是唯一的,所以每个x只会保留最后一个y值 实际执行顺序: x=1 → y=2 → {1 :2 } x=1 → y=4 → {1 :4 } (覆盖前一个) x=1 → y=6 → {1 :6 } (覆盖前一个) x=3 → y=2 → {1 :6 , 3 :2 } x=3 → y=4 → {1 :6 , 3 :4 } x=3 → y=6 → {1 :6 , 3 :6 } x=5 → y=2 → {1 :6 , 3 :6 , 5 :2 } x=5 → y=4 → {1 :6 , 3 :6 , 5 :4 } x=5 → y=6 → {1 :6 , 3 :6 , 5 :6 } {x:y for x, y in zip ([1 , 3 , 5 ], [2 , 4 , 6 ])}
集合
无序性 :集合中的元素没有固定顺序唯一性 :集合中的元素都是唯一的(自动去重)可变性 :集合本身是可变的,可以添加或删除元素元素限制 :集合元素必须是不可变类型(数字、字符串、元组等),不能包含列表、字典等可变对象
创建集合 1 2 3 4 5 6 7 8 9 10 11 12 13 14 15 16 17 18 19 20 21 22 23 24 25 26 27 28 29 30 fruits = {'apple' , 'banana' , 'orange' } print (fruits) numbers = set ([1 , 2 , 3 , 2 , 1 ]) print (numbers) letters = set ("hello" ) print (letters) empty_set = set () fs1 = frozenset ([1 , 2 , 3 , 2 , 1 ]) print (fs1) fs2 = frozenset ("hello" ) print (fs2) empty_fs = frozenset ()
添加元素 1 2 3 4 5 6 7 8 9 fruits = {'apple' , 'banana' } fruits.add('orange' ) fruits.update(['kiwi' , 'mango' ]) print (fruits) s = set () s.add("23" ) s.update("45" )
删除元素 1 2 3 4 5 numbers = {1 , 2 , 3 , 4 , 5 } numbers.remove(3 ) numbers.discard(10 ) popped = numbers.pop() numbers.clear()
基本集合运算 并集 (Union) 1 2 3 4 5 6 7 8 9 10 11 12 a = {1 , 2 , 3 } b = {3 , 4 , 5 } print (a | b) print (a.union(b)) c = {5 , 6 , 7 } print (a | b | c)
交集 (Intersection) 1 2 3 4 5 6 7 8 print (a & b) print (a.intersection(b)) print (a & b & {3 , 6 })
差集 (Difference) 1 2 3 4 5 6 7 8 print (a - b) print (a.difference(b)) print (a - b - {1 })
对称差集 (Symmetric Difference) 1 2 3 4 5 print (a ^ b) print (a.symmetric_difference(b))
集合比较运算 子集检查 1 2 3 4 5 6 7 8 9 10 11 12 x = {1 , 2 } y = {1 , 2 , 3 } print (x <= y) print (x.issubset(y)) print (x < y) print (x < x)
超集检查 1 2 3 4 5 6 7 8 print (y >= x) print (y.issuperset(x)) print (y > x)
不相交检查 1 2 3 4 5 set1 = {1 , 2 } set2 = {3 , 4 } print (set1.isdisjoint(set2)) print (set1 & set2 == set ())
更新集合的运算 更新并集 1 2 3 a = {1 , 2 } a.update({3 , 4 }) print (a)
更新交集 1 2 3 a = {1 , 2 , 3 } a.intersection_update({2 , 3 , 4 }) print (a)
更新差集 1 2 3 a = {1 , 2 , 3 } a.difference_update({2 , 4 }) print (a)
更新对称差集 1 2 3 a = {1 , 2 , 3 } a.symmetric_difference_update({2 , 3 , 4 }) print (a)
函数 定义/调用/返回值 1 2 3 4 5 6 7 8 9 10 11 12 13 14 15 16 17 18 19 def function_name (parameters ): """docstring""" return [expression] def div (x, y ): if y == 0 : return "除数不能为零!" return x / y div(4 , 2 ) div(4 , 0 ) def myfunc (): pass print (myfunc())
参数 位置参数 1 2 3 4 def power (base, exponent ): return base ** exponent print (power(2 , 3 ))
关键字参数 1 print (power(exponent=3 , base=2 ))
限制参数 1 2 3 4 5 6 7 8 9 10 11 12 13 14 15 16 17 18 19 def abc (a, /, b, c ): print (a, b, c) abc(a=1 , 2 , 3 ) abc(1 , 2 , 3 ) def abc (a, *, b, c ): print (a, b, c) abc(1 , 2 , 3 ) Traceback (most recent call last): File "<pyshell#5>" , line 1 , in <module> abc(1 , 2 , 3 ) TypeError: abc() takes 1 positional argument but 3 were given abc(1 , b=2 , c=3 )
默认参数 1 2 3 4 5 6 def power (base, exponent=2 ): return base ** exponent print (power(3 )) print (power(3 , 3 ))
可变长度参数
*args - 接收任意数量的位置参数(元组)**kwargs - 接收任意数量的关键字参数(字典)
1 2 3 4 5 6 7 8 9 10 11 12 13 14 15 16 17 18 19 20 21 22 23 24 25 26 27 28 29 30 31 32 33 34 35 36 def print_info (*args, **kwargs ): print (args) print (kwargs) for arg in args: print (arg) for key, value in kwargs.items(): print (f"{key} : {value} " ) print_info(1 , 2 , 3 , name="Alice" , age=25 ) (1 , 2 , 3 ) {'name' : 'Alice' , 'age' : 25 } 1 2 3 name: Alice age: 25 def myfunc (a, *b, **c ): print (a, b, c) myfunc(1 , 2 , 3 , 4 , x=5 , y=6 ) def myfunc (a, b, c, d ): print (a, b, c, d) args = (1 , 2 , 3 , 4 ) myfunc(*args) kwargs = {'a' :1 , 'b' :2 , 'c' :3 , 'd' :4 } myfunc(**kwargs)
变量作用域
局部变量 :函数内部定义的变量全局变量 :函数外部定义的变量使用global关键字在函数内修改全局变量,不推荐这种做法
1 2 3 4 5 6 count = 0 def increment (): global count count += 1 local_var = 10
嵌套 1 2 3 4 5 6 7 8 9 10 11 12 13 14 15 16 17 18 19 20 21 22 23 24 25 26 27 28 29 30 def funcA (): x = 520 def funcB (): x = 888 print ("In funcB, x =" , x) funcB() print ("In funcA, x =" , x) funcB() Traceback (most recent call last): File "<pyshell#19>" , line 1 , in <module> funcB() NameError: name 'funcB' is not defined. Did you mean: 'funA' ? funcA() In funcB, x = 888 In funcA, x = 520 def funcA (): x = 520 def funcB (): nonlocal x x = 888 print ("In funcB, x =" , x) funcB() print ("In funcA, x =" , x) funcA() In funcB, x = 888 In funcA, x = 888
LEGB
L (Local) - 局部作用域E (Enclosing) - 嵌套函数的非局部作用域G (Global) - 全局作用域B (Built-in) - 内置作用域
Python 查找变量时按照 L → E → G → B 的顺序依次查找。
Local (局部作用域) 在函数内部定义的变量,只在函数内部可见。
1 2 3 4 5 6 def my_func (): x = 10 print (x) my_func() print (x)
Enclosing (嵌套作用域) 在嵌套函数中,内部函数可以访问外部函数的变量。
1 2 3 4 5 6 7 8 9 def outer (): y = 20 def inner (): print (y) inner() outer()
Global (全局作用域) 在模块级别定义的变量,整个模块可见。
1 2 3 4 5 6 z = 30 def my_func (): print (z) my_func()
Built-in (内置作用域) Python 内置的函数和异常等,如 print(), len(), ValueError 等。
1 2 3 4 def my_func (): print (len ("hello" )) my_func()
闭包 闭包指的是一个函数能够记住并访问其词法作用域中的变量,即使该函数在其词法作用域之外执行
工作原理:当外部函数执行完毕后,其命名空间通常会被销毁,但如果内部函数引用了外部函数的变量,这些变量会被保留下来,形成闭包
闭包需要满足三个条件:
必须有嵌套函数(函数内部定义函数)
内部函数必须引用外部函数的变量
外部函数必须返回内部函数
基本示例 1 2 3 4 5 6 7 8 9 def outer_func (x ): def inner_func (y ): return x + y return inner_func closure = outer_func(10 ) print (closure(5 )) print (closure(10 ))
保持状态 nonlocal 是 Python 中用于在嵌套函数(函数内部的函数)中声明一个变量不是局部变量,而是来自外层函数作用域 (但不是全局作用域)的关键字
1 2 3 4 5 6 7 8 9 10 11 12 def counter (): count = 0 def increment (): nonlocal count count += 1 return count return increment c = counter() print (c()) print (c()) print (c())
1 2 3 4 5 6 7 8 9 10 11 12 13 14 15 16 17 18 19 20 21 22 23 24 origin = (0 , 0 ) legal_x = [-100 , 100 ] legal_y = [-100 , 100 ] def create (post_x = 0 , post_y = 0 ): def moving (direction, step ): nonlocal post_x, post_y new_x = post_x + direction[0 ] * step new_y = post_y + direction[1 ] * step if new_x < legal_x[0 ]: post_x = legal_x[0 ] - (new_x - legal_x[0 ]) elif new_x > legal_x[1 ]: post_x = legal_x[1 ] - (new_x - legal_x[1 ]) else : post_x = new_x if new_y < legal_y[0 ]: post_y = legal_y[0 ] - (new_y - legal_y[0 ]) elif new_y > legal_y[1 ]: post_y = legal_y[1 ] - (new_y - legal_y[1 ]) else : post_y = new_y return post_x, post_y return moving
创建特定功能的函数 1 2 3 4 5 6 7 8 9 10 11 12 def power (exp ): def exp_of (base ): return base ** exp return exp_of square = power(2 ) cube = power(3 ) square(4 ) 16 cube(4 ) 64
装饰器 装饰器是Python中一种强大的语法特性,允许在不修改原函数代码的情况下,动态地扩展函数的功能。装饰器本质上是一个高阶函数,接受一个函数作为参数并返回一个新的函数
基本语法 1 2 3 4 5 6 7 8 9 10 11 12 13 14 15 def my_decorator (func ): def wrapper (): print ("Before function call" ) func() print ("After function call" ) return wrapper @my_decorator def say_hello (): print ("Hello!" ) say_hello() Before function call Hello! After function call
等价形式:
1 2 3 4 5 6 7 8 @my_decorator def say_hello (): print ("Hello!" ) def say_hello (): print ("Hello!" ) say_hello = my_decorator(say_hello)
装饰器叠加 装饰器可以叠加使用,执行顺序是从下往上:
1 2 3 4 5 6 7 8 9 10 11 12 13 14 15 16 17 18 19 20 def decorator1 (func ): def wrapper (): print ("Decorator 1 before" ) func() print ("Decorator 1 after" ) return wrapper def decorator2 (func ): def wrapper (): print ("Decorator 2 before" ) func() print ("Decorator 2 after" ) return wrapper @decorator1 @decorator2 def my_function (): print ("Original function" ) my_function()
输出:
1 2 3 4 5 Decorator 1 before Decorator 2 before Original function Decorator 2 after Decorator 1 after
“带参数的函数”装饰 1 2 3 4 5 6 7 8 9 10 11 def decorator (func ): def wrapper (*args, **kwargs ): print ("Decorator is working" ) return func(*args, **kwargs) return wrapper @decorator def greet (name ): print (f"Hello, {name} !" ) greet("Alice" )
带参数的装饰器 装饰器本身也可以接受参数(加一层嵌套):
1 2 3 4 5 6 7 8 def decorator_with_args (decorator_arg1, decorator_arg2, ... ): def decorator (func ): def wrapper (*args, **kwargs ): return result return wrapper return decorator
1 2 3 4 5 6 7 8 9 10 11 12 13 14 15 16 17 18 19 20 21 22 23 24 25 26 27 import timedef logger (msg ): def time_master (func ): def call_func (): start = time.time() func stop = time.time() print (f"[{msg} ]一共耗费了{(stop-start):.2 f} " ) return call_func return time_master @logger(msg="A" ) def funcA (): time.sleep(1 ) print ("正在调用funcA" ) @logger(msg="B" ) def funcB (): time.sleep(1 ) print ("正在调用funcB" ) funcA() funcB() funA = logger(msg="A" )(funcA) funB = logger(msg="B" )(funcB)
Lambda 表达式(匿名函数) Lambda 表达式(也称为匿名函数)是 Python 中一种简洁的函数定义方式,可以用一行代码创建小型函数而无需使用 def 关键字
1 lambda arguments: expression
lambda:关键字,表示定义一个 lambda 表达式arguments:函数的参数,可以有多个,用逗号分隔expression:单个表达式,作为函数的返回值
基本示例 1 2 3 4 5 6 7 8 9 10 11 12 13 14 square = lambda x: x**2 print (square(5 )) add = lambda a, b: a + b print (add(3 , 4 )) get_answer = lambda : 42 print (get_answer()) max_num = lambda a, b: a if a > b else b print (max_num(10 , 20 ))
常见使用场景 与高阶函数配合使用 在 map() 中使用
1 2 3 numbers = [1 , 2 , 3 , 4 ] squared = list (map (lambda x: x**2 , numbers)) print (squared)
在 filter() 中使用
1 2 3 numbers = [1 , 2 , 3 , 4 , 5 , 6 ] evens = list (filter (lambda x: x % 2 == 0 , numbers)) print (evens)
在 sorted() 中使用
1 2 3 pairs = [(1 , 'one' ), (3 , 'three' ), (2 , 'two' )] sorted_pairs = sorted (pairs, key=lambda pair: pair[0 ]) print (sorted_pairs)
作为函数参数 1 2 3 4 5 def operate (func, x, y ): return func(x, y) result = operate(lambda a, b: a * b, 5 , 3 ) print (result)
生成器 生成器是 Python 中一种特殊的迭代器,允许你按需生成值,而不是一次性生成所有值并存储在内存中。这种惰性求值的特性使得生成器非常适合处理大数据流或无限序列
惰性求值 状态保持 内存高效
生成器函数 生成器函数使用 yield 语句而不是 return 来返回值
1 2 3 4 5 6 7 8 9 10 def count_up_to (max count = 1 while count <= max : yield count count += 1 counter = count_up_to(5 ) print (next (counter)) print (next (counter))
当调用生成器函数时,返回一个生成器对象但不立即执行函数体
第一次调用 next() 时,执行到第一个 yield 语句并暂停
再次调用 next() 时,从上次暂停的位置继续执行,直到下一个 yield
当函数结束时(或遇到 return),抛出 StopIteration 异常
1 2 3 4 5 6 7 8 9 10 def fib (): a1, a2 = 0 , 1 while True : yield a1 a1, a2 = a2, a1 + a2 next (fib)0 next (fib)1
生成器表达式 1 2 3 squares = (x**2 for x in range (5 )) print (next (squares)) print (next (squares))
递归 递归是一种函数调用自身的编程技术,特别适合解决可以分解为相似子问题的问题
递归函数包含两个部分:
基准条件(Base Case) :递归终止的条件递归条件(Recursive Case) :函数调用自身的条件
1 2 3 4 5 def recursive_function (params ): if base_case_condition(params): return base_case_value else : return recursive_function(modified_params)
基本示例 阶乘运算:
1 2 3 4 5 6 7 8 9 10 11 12 13 14 15 16 17 18 19 def factorial (n ): if n == 1 : return 1 else : return n * factorial(n-1 ) print (factorial(5 )) 递归过程: factorial(5 ) 5 * factorial(4 )5 * (4 * factorial(3 ))5 * (4 * (3 * factorial(2 )))5 * (4 * (3 * (2 * factorial(1 ))))5 * (4 * (3 * (2 * 1 )))5 * (4 * (3 * 2 ))5 * (4 * 6 )5 * 24 120
斐波那契数列:
1 2 3 4 5 def fibonacci (n ): if n <= 1 : return n else : return fibonacci(n-1 ) + fibonacci(n-2 )
汉诺塔问题 3根柱子(通常称为A、B、C),n个大小不一的圆盘,最初全部叠放在柱子A上,圆盘从下到上按大小递减排列
目标:将所有圆盘从柱子A移动到柱子C
游戏规则 :
一次只能移动一个圆盘
每次移动时,将最上面的圆盘移动到某一根柱子上
任何时候都不能将较大的圆盘放在较小的圆盘上面
对于n个圆盘的汉诺塔问题:
将上面的n-1个圆盘从A移动到B(借助C)
将第n个(最大的)圆盘从A移动到C
将那n-1个圆盘从B移动到C(借助A)
1 2 3 4 5 6 7 8 9 10 11 12 13 14 15 16 17 18 19 20 21 22 def hanoi (n, source, target, auxiliary ): """ 汉诺塔递归解法 参数: n: 圆盘数量 source: 起始柱子 target: 目标柱子 auxiliary: 辅助柱子 """ if n > 0 : hanoi(n-1 , source, auxiliary, target) print (f"移动圆盘 {n} 从 {source} 到 {target} " ) hanoi(n-1 , auxiliary, target, source) hanoi(3 , 'A' , 'C' , 'B' )
递归与迭代的比较
特性
递归 (Recursion)
迭代 (Iteration)
定义 函数直接或间接调用自身
通过循环结构重复执行代码块
终止条件 必须有基准条件(base case)来终止递归
通过循环条件控制终止
实现方式 通过函数调用栈实现
通过循环变量和条件判断实现
维度
递归
迭代
时间复杂度 可能较高(如朴素斐波那契为O(2^n))
通常更优(斐波那契迭代为O(n))
空间复杂度 需要维护调用栈,O(n)
通常只需要常数空间,O(1)
函数调用开销 每次递归都有函数调用开销
无额外函数调用开销
内存限制 受限于调用栈深度(Python默认约1000层)
不受此限制
函数文档 用help()查看函数文档
单行:
1 2 3 def add (a, b ): """返回两个数字的和。""" return a + b
多行:
1 2 3 4 5 6 7 8 9 10 11 def calculate_area (radius ): """ 计算圆的面积。 参数: radius (float): 圆的半径,必须为正数 返回: float: 圆的面积 """ return 3.14159 * radius ** 2
标准文档格式(Google风格):
1 2 3 4 5 6 7 8 9 10 11 12 13 14 15 16 17 18 19 20 def fetch_data (url, retries=3 ): """ 从指定URL获取数据。 参数: url (str): 要获取数据的URL地址 retries (int, optional): 重试次数,默认为3 返回: dict: 包含获取的数据的字典 抛出: ConnectionError: 当连接失败时抛出 ValueError: 当URL无效时抛出 示例: >>> data = fetch_data("https://api.example.com/data") >>> print(data.keys()) """
类型注释 变量类型注释:
1 2 3 4 name: str = "Alice" age: int = 25 is_student: bool = True scores: list [float ] = [90.5 , 88.0 , 92.5 ]
函数类型注释:
1 2 3 4 5 6 7 8 9 10 def greet (name: str ) -> str : return f"Hello, {name} " def calculate_area (radius: float , pi: float = 3.14159 ) -> float : return pi * radius ** 2 def myfunc (s:dict [str : int ], n:int = 3 ): return list (s.keys()) * n myfunc({'A' :1 , 'B' :2 , 'C' :3 })
函数内省 内省是指程序在运行时检查对象类型和属性的能力
1 2 3 4 5 6 7 8 9 10 11 12 13 14 15 16 17 18 19 20 21 def example (a: int , b: float = 3.14 ) -> str : """示例函数""" return f"{a} and {b} " print (example.__name__) print (example.__doc__) print (example.__annotations__)import inspectsig = inspect.signature(example) print (sig)
高阶函数 高阶函数满足以下至少一个条件:
接受一个或多个函数作为参数
返回一个函数作为结果
内置高阶函数 Python 内置了几个常用的高阶函数:
map(function, iterable)
对可迭代对象的每个元素应用函数:
1 2 3 4 5 6 numbers = [1 , 2 , 3 , 4 ] squared = map (lambda x: x**2 , numbers) print (list (squared)) squared = [x**2 for x in numbers]
filter(function, iterable)
过滤可迭代对象中满足条件的元素:
1 2 3 4 5 6 numbers = [1 , 2 , 3 , 4 , 5 , 6 ] evens = filter (lambda x: x % 2 == 0 , numbers) print (list (evens)) evens = [x for x in numbers if x % 2 == 0 ]
functools.reduce(function, iterable[, initializer])
对可迭代对象进行累积计算:
1 2 3 4 5 6 7 8 9 10 11 12 13 14 15 16 from functools import reducedef add (x, y ): return x + y reduce(add, [1 , 2 , 3 , 4 , 5 ]) numbers = [1 , 2 , 3 , 4 ] product = reduce(lambda x, y: x * y, numbers) print (product) sum_squared = reduce(lambda acc, x: acc + x**2 , numbers, 0 ) print (sum_squared)
sorted(iterable, key=None, reverse=False)
根据 key 函数对可迭代对象排序:
1 2 3 words = ["banana" , "pie" , "apple" , "orange" ] sorted_words = sorted (words, key=lambda x: len (x)) print (sorted_words)
自定义高阶函数 接受函数作为参数
1 2 3 4 5 6 def apply_operation (func, a, b ): """应用给定函数到两个参数""" return func(a, b) result = apply_operation(lambda x, y: x + y, 5 , 3 ) print (result)
返回函数
1 2 3 4 5 6 7 8 def make_multiplier (factor ): """创建乘法器函数""" def multiplier (x ): return x * factor return multiplier times2 = make_multiplier(2 ) print (times2(5 ))
装饰器函数
1 2 3 4 5 6 7 8 9 10 11 12 13 14 15 16 17 def log_time (func ): """记录函数执行时间的装饰器""" def wrapper (*args, **kwargs ): import time start = time.time() result = func(*args, **kwargs) end = time.time() print (f"{func.__name__} executed in {end-start:.4 f} s" ) return result return wrapper @log_time def slow_function (): import time time.sleep(1 ) slow_function()
偏函数 偏函数是指通过固定一个函数的部分参数,创建一个新的函数。这个新函数只需要传入剩余的参数即可执行
使用 functools.partial
1 2 3 4 5 6 7 8 9 10 from functools import partialdef power (base, exponent ): return base ** exponent square = partial(power, exponent=2 ) print (square(5 ))
@wraps 装饰器@wraps 是 Python 标准库 functools 模块提供的一个装饰器,用于解决装饰器使用过程中的元信息丢失问题
元信息丢失 当使用装饰器时,原始函数的 __name__、__doc__ 等元信息会被包装函数的元信息覆盖:
1 2 3 4 5 6 7 8 9 10 11 12 13 def my_decorator (func ): def wrapper (*args, **kwargs ): """包装函数的文档字符串""" return func(*args, **kwargs) return wrapper @my_decorator def example (): """原始函数的文档字符串""" pass print (example.__name__) print (example.__doc__)
引发的问题:
调试困难:堆栈跟踪显示的是包装函数名
文档丢失:原始函数的文档字符串不可见
自省失效:help() 等工具显示错误信息
使用 @wraps 保留元信息 1 2 3 4 5 6 7 8 9 10 11 12 13 14 15 16 from functools import wrapsdef my_decorator (func ): @wraps(func ) def wrapper (*args, **kwargs ): """包装函数的文档字符串""" return func(*args, **kwargs) return wrapper @my_decorator def example (): """原始函数的文档字符串""" pass print (example.__name__) print (example.__doc__)
@wraps 会复制以下属性到包装函数:
__name____doc____module____annotations____dict__(原始函数的其他属性)
永久存储 open()函数 1 open (file, mode='r' , buffering=-1 , encoding=None , errors=None , newline=None , closefd=True , opener=None )
参数说明:
file (必需)
文件路径(相对或绝对路径)
可以是字符串或字节对象
mode (可选)
指定打开文件的模式,默认为 'r' (只读)
常用模式:
'r' - 只读(默认)'w' - 写入,会覆盖已有文件'x' - 独占创建,如果文件已存在则失败'a' - 追加,写入内容到文件末尾'b' - 二进制模式't' - 文本模式(默认)'+' - 更新(可读可写)
组合模式示例:
'rb' - 以二进制格式只读'w+' - 可读可写,会覆盖已有文件'a+' - 可读可追加
buffering (可选)
设置缓冲策略
0 - 关闭缓冲(仅在二进制模式下)
1 - 行缓冲(仅在文本模式下)
大于1的整数 - 指定缓冲区大小(字节)
不指定或-1 - 使用默认缓冲策略
encoding (可选)
指定文件的编码格式(如 'utf-8', 'gbk' 等)
仅在文本模式下使用
errors (可选)
指定编码错误处理方式
如 'strict' (默认), 'ignore', 'replace' 等
newline (可选)
控制换行符行为
None (默认) - 通用换行模式'' - 不转换换行符'\n', '\r', '\r\n' - 指定换行符
注意事项 文件覆盖问题 坑 :使用 'w' 模式会直接覆盖原有文件内容
1 2 with open ('data.txt' , 'w' ) as f: f.write('New content' )
✅ 解决方案 :
1 2 3 4 5 6 7 import osif os.path.exists('data.txt' ): os.rename('data.txt' , 'data.bak.txt' ) with open ('data.txt' , 'w' ) as f: f.write('New content' )
编码问题 坑 :不指定编码可能导致乱码(特别是Windows平台)
1 2 3 with open ('data.txt' , 'w' ) as f: f.write('中文内容' )
✅ 解决方案 :
始终明确指定文件编码(推荐UTF-8)
处理非ASCII字符时特别注意
1 2 with open ('data.txt' , 'w' , encoding='utf-8' ) as f: f.write('中文内容' )
换行符问题 坑 :不同操作系统换行符不同(Windows: \r\n, Unix: \n)
1 2 3 with open ('data.txt' , 'w' ) as f: f.write('Line1\nLine2' )
✅ 解决方案 :
使用 newline 参数控制换行符
需要跨平台一致时指定 newline='\n'
1 2 with open ('data.txt' , 'w' , newline='\n' ) as f: f.write('Line1\nLine2' )
路径问题 坑 :相对路径导致的文件写入位置不确定
1 2 3 with open ('data/output.txt' , 'w' ) as f: f.write('some data' )
✅ 解决方案 :
使用绝对路径
用 os.path 处理路径
检查目录是否存在
1 2 3 4 5 6 7 8 9 import osoutput_dir = 'data' if not os.path.exists(output_dir): os.makedirs(output_dir) file_path = os.path.join(output_dir, 'output.txt' ) with open (file_path, 'w' ) as f: f.write('some data' )
文件对象常用方法 读取相关方法 read(size=-1)
功能:从文件中读取指定大小的数据
参数:
size:可选,要读取的字节数(文本模式为字符数)
负数或省略:读取全部内容
正数:读取指定大小的数据
返回:字符串(文本模式)或字节对象(二进制模式)
1 2 3 4 with open ('example.txt' , 'r' ) as f: content = f.read() f.seek(0 ) first_100 = f.read(100 )
readline(size=-1)
功能:读取文件中的一行
参数:
size:可选,如果指定则读取该行的前size个字符
返回:字符串(包含换行符)
1 2 3 with open ('example.txt' , 'r' ) as f: first_line = f.readline() second_line = f.readline()
readlines(hint=-1)
功能:读取所有行并返回列表
参数:
hint:可选,如果指定则读取大约hint字节的数据(不是精确值)
返回:包含所有行的列表(每行包含换行符)
1 2 with open ('example.txt' , 'r' ) as f: all_lines = f.readlines()
写入相关方法 write(string)
功能:将字符串写入文件
参数:
string:要写入的字符串(文本模式)或字节对象(二进制模式)
返回:写入的字符/字节数
1 2 3 with open ('output.txt' , 'w' ) as f: f.write('Hello, World!\n' ) f.write('Second line' )
writelines(sequence)
功能:将字符串序列写入文件
参数:
注意:不会自动添加换行符
1 2 3 lines = ['First line\n' , 'Second line\n' , 'Third line\n' ] with open ('output.txt' , 'w' ) as f: f.writelines(lines)
文件指针操作 seek(offset, whence=0)
功能:移动文件指针到指定位置
参数:
offset:偏移量whence:
0(默认):从文件开头计算1:从当前位置计算2:从文件末尾计算
注意:文本模式下只支持从开头(0)的查找
1 2 3 with open ('example.txt' , 'rb' ) as f: f.seek(10 ) f.seek(-5 , 2 )
tell()
功能:返回当前文件指针的位置
返回:整数,表示指针位置(字节数)
1 2 3 4 with open ('example.txt' , 'r' ) as f: pos = f.tell() f.read(10 ) new_pos = f.tell()
其他实用方法 flush()
功能:强制将缓冲区内容写入磁盘
说明:通常文件关闭或缓冲区满时会自动flush,但有时需要手动立即写入
1 2 3 with open ('important.log' , 'a' ) as f: f.write('Critical error occurred!\n' ) f.flush()
truncate(size=None)
功能:截断文件到指定大小
参数:
size:可选,要截断到的大小(字节)。如果省略,则截断到当前位置
注意:文件必须以可写模式打开
1 2 3 with open ('data.txt' , 'r+' ) as f: f.seek(100 ) f.truncate()
close()
功能:关闭文件
说明:使用 with 语句时会自动调用,通常不需要手动调用
1 2 3 4 5 f = open ('example.txt' , 'r' ) try : content = f.read() finally : f.close()
文件对象属性 closed
1 2 3 4 f = open ('example.txt' , 'r' ) print (f.closed) f.close() print (f.closed)
mode
1 2 with open ('example.txt' , 'r' ) as f: print (f.mode)
name
1 2 with open ('example.txt' , 'r' ) as f: print (f.name)
pathlib 模块pathlib 是 Python 3.4+ 引入的面向对象(路径不再是字符串,而是 Path 对象)的文件系统路径操作模块,比传统的 os.path 更直观、更易用
创建Path对象 1 2 3 4 5 6 7 8 9 10 11 12 13 14 15 16 17 from pathlib import Pathp = Path() p = Path('dir/sub_dir/file.txt' ) p = Path('/usr/local/bin' ) p = Path.home() p = Path.cwd()
路径拼接 使用 / 操作符拼接路径:
1 2 3 dir_path = Path('/home/user' ) file_path = dir_path / 'documents' / 'file.txt' print (file_path)
使用 joinpath() 方法:
1 file_path = dir_path.joinpath('documents' , 'file.txt' )
路径解析 获取路径各部分:
1 2 3 4 5 6 7 8 9 10 11 12 13 14 15 16 17 18 19 20 21 22 23 24 25 26 27 28 29 30 31 32 33 p = Path('/home/user/documents/file.txt' ) print (p.parts) print (p.parent) print (p.parent.parent) print (p.parents) for parent in p.parents: print (parent) /home/user/documents /home/user /home / print (p.name) print (p.stem) print (p.suffix) p = Path('archive.tar.gz' ) print (p.suffixes)
转为绝对路径:
1 2 3 p = Path('file.txt' ) abs_p = p.absolute() print (abs_p)
解析符号链接:
1 2 p = Path('/some/symlink' ) real_p = p.resolve()
相对路径计算:
1 2 3 p1 = Path('/path/to/file' ) p2 = Path('/path' ) print (p1.relative_to(p2))
路径修改 1 2 3 4 5 6 7 8 9 10 11 12 13 p = Path('/home/user/file.txt' ) new_p = p.with_name('newfile.txt' ) print (new_p) new_p = p.with_suffix('.pdf' ) print (new_p) new_p = p.with_stem('new_stem' ) print (new_p)
路径测试 1 2 3 4 5 6 7 8 9 10 11 12 13 14 15 16 p = Path('example.txt' ) print (p.exists()) print (p.is_file())print (p.is_dir())print (p.is_absolute())print (p.is_symlink())
文件系统操作 创建目录:
1 2 3 4 5 6 7 8 p = Path('new_dir' ) p.mkdir() p.mkdir(exist_ok=True ) p = Path('dir/sub_dir/sub_sub_dir' ) p.mkdir(parents=True , exist_ok=True )
删除目录或文件:
1 2 3 4 5 6 7 8 9 10 11 12 p = Path('file.txt' ) p.unlink() p.unlink(missing_ok=True ) p = Path('empty_dir' ) p.rmdir() import shutilshutil.rmtree(p)
重命名/移动:
1 2 3 4 5 p = Path('old_name.txt' ) p.rename('new_name.txt' ) p.rename(Path('other_dir' ) / 'new_name.txt' )
文件操作 读写文件:
1 2 3 4 5 6 7 8 9 10 11 12 13 14 15 16 17 18 p = Path('file.txt' ) p.write_text('Hello, world!' ) with p.open ('a' ) as f: f.write('\nAppended text' ) content = p.read_text() print (content)data = p.read_bytes() p.write_bytes(b'binary data' )
文件统计信息:
1 2 3 4 5 6 7 8 9 10 11 p = Path('file.txt' ) p.stat() print (p.stat().st_size)print (p.stat().st_mtime) from datetime import datetimeprint (datetime.fromtimestamp(p.stat().st_mtime))
目录遍历 1 2 3 4 5 6 7 8 9 10 11 12 13 14 15 16 17 18 p = Path('/path/to/dir' ) for child in p.iterdir(): print (child) for item in p.glob('**/*' ): print (item) for py_file in p.glob('*.py' ): print (py_file) for py_file in p.rglob('*.py' ): print (py_file)
with 语句与上下文管理器with 语句是 Python 中用于资源管理的重要语法结构,通过上下文管理器(Context Manager)自动管理资源的获取和释放
1 2 with expression [as variable]:
常见用途:
1 2 3 4 5 6 7 8 9 10 11 12 13 14 with open ('file.txt' , 'r' ) as f: content = f.read() with threading.Lock(): pass with sqlite3.connect('db.sqlite' ) as conn: cursor = conn.cursor()
对比:
1 2 3 4 5 6 7 8 9 10 f = open ("demo.txt" , "W" ) f.write("Hello!" ) 1 /0 f.close() with open ("demo.txt" , "w" ) as f: f.write("hello!" ) 1 /0
pickle 模块pickle 是 Python 的标准模块,用于实现 Python 对象的序列化 和反序列化 ,可以将内存中的 Python 对象转换为字节流(序列化),也可以将字节流还原为 Python 对象(反序列化)
序列化(dump) 1 2 3 4 5 6 7 8 9 10 11 import pickledata = { 'name' : 'Alice' , 'age' : 25 , 'scores' : [88 , 92 , 95 ] } with open ('data.pkl' , 'wb' ) as f: pickle.dump(data, f)
反序列化(load) 1 2 3 4 5 with open ('data.pkl' , 'rb' ) as f: loaded_data = pickle.load(f) print (loaded_data)
内存中的序列化(dumps/loads) 1 2 3 4 5 serialized = pickle.dumps(data) deserialized = pickle.loads(serialized)
可序列化的对象类型 pickle 可以序列化大多数 Python 对象,包括:
基本数据类型:int, float, bool, str, bytes, None
容器类型:list, tuple, dict, set
函数和类(只序列化名称,不序列化代码)
类的实例(默认序列化实例的 __dict__)
异常 常见内置异常: 1 2 3 4 5 6 7 8 9 10 11 12 13 14 15 16 17 18 19 20 21 22 23 24 25 26 27 28 BaseException ├── SystemExit ├── KeyboardInterrupt ├── GeneratorExit └── Exception ├── ArithmeticError │ ├── FloatingPointError │ ├── OverflowError │ └── ZeroDivisionError ├── AssertionError ├── AttributeError ├── BufferError ├── EOFError ├── ImportError ├── LookupError │ ├── IndexError │ └── KeyError ├── MemoryError ├── NameError ├── OSError │ ├── FileNotFoundError │ ├── PermissionError │ └── TimeoutError ├── RuntimeError │ └── NotImplementedError ├── SyntaxError ├── TypeError └── ValueError
try-except块 1 2 3 4 5 6 7 try : result = 10 / 0 except ZeroDivisionError as e: print ("不能除以零!" ) print (f"错误详情:{e} " )
处理多个异常:
1 2 3 4 5 6 7 8 9 10 11 12 13 14 15 16 17 try : value = int ("abc" ) result = 10 / value except (ValueError, ZeroDivisionError) as e: print (f"发生错误: {e} " ) try : 1 / 0 "demo" + 520 except ZeroDivisionError: print ("除数不能为零!" ) except ValueError: print ("值不正确!" ) except TypeError: print ("类型不正确" )
完整try-except-else-finally块 1 2 3 4 5 6 7 8 9 10 11 12 13 14 15 16 17 18 19 20 21 try : risky_operation() except ExceptionType1: handle_exception1() except ExceptionType2 as e: handle_exception2(e) except (ExceptionType3, ExceptionType4) as e: handle_multiple_exceptions(e) except : handle_unexpected_errors() else : operation_when_no_error() finally : cleanup_resources()
各部分详解:
try 块
包含可能引发异常的代码
执行顺序:首先运行 try 块中的代码
最佳实践:
只包含可能引发异常的代码
避免过于庞大的 try 块
1 2 3 4 try : file = open ('data.txt' , 'r' ) data = file.read() processed = int (data)
except 块
捕获并处理特定异常
可以有多个 except 块处理不同类型的异常
最佳实践:
从具体到一般排列 except 块
尽量捕获具体异常而非所有异常
1 2 3 4 5 6 except FileNotFoundError: print ("文件不存在,将使用默认值" ) processed = 0 except ValueError as e: print (f"文件内容不是有效数字: {e} " ) processed = None
else 块
当 try 块没有引发任何异常时执行
执行顺序:在 try 块成功完成后,在 finally 之前
最佳实践:
将不直接关联异常检查的代码放在 else 中
避免在 else 中放入可能引发新异常的代码
1 2 3 else : print (f"成功读取并处理数据: {processed} " ) save_to_database(processed)
finally 块
无论是否发生异常都会执行
常用于资源清理(如关闭文件、释放锁等)
即使有 return、break 或 continue 也会执行
最佳实践:
确保释放所有获取的资源
避免在 finally 中使用 return(会抑制异常)
1 2 3 4 finally : if 'file' in locals () and file: file.close() print ("资源清理完成" )
执行流程示意图:
1 2 3 4 5 6 7 8 9 10 11 开始 | └─ 执行 try 块 | ├─ 无异常 → 执行 else 块 → 执行 finally 块 → 继续后续代码 | └─ 有异常 → 匹配 except 块 | ├─ 找到匹配 → 执行 except 块 → 执行 finally 块 → 继续后续代码 | └─ 未找到匹配 → 执行 finally 块 → 异常向上传播
raise 语句raise 是 Python 中用于主动抛出异常的关键字,允许程序员在检测到错误或特殊情况时中断正常程序流程并引发异常
抛出内置异常:
1 2 3 4 5 6 7 8 9 def calculate_average (numbers ): if not numbers: raise ValueError("数字列表不能为空" ) return sum (numbers) / len (numbers) try : avg = calculate_average([]) except ValueError as e: print (f"错误: {e} " )
重新抛出当前异常:
1 2 3 4 5 6 try : risky_operation() except SomeError: print ("发生了错误,但需要进一步处理" ) raise
assert 语句assert 是 Python 中的断言语句,用于在程序中设置检查点,验证某个条件是否为真。如果条件为假,则会引发 AssertionError 异常
常用于调试
1 assert condition, "optional error message"
condition:要测试的条件表达式optional error message:可选,当断言失败时显示的错误信息
示例:
1 2 3 4 5 6 7 def calculate_average (numbers ): assert len (numbers) > 0 , "数字列表不能为空" return sum (numbers) / len (numbers) print (calculate_average([1 , 2 , 3 ])) print (calculate_average([]))
利用异常来实现goto 1 2 3 4 5 6 7 8 9 10 11 12 13 14 15 16 try : while True : while True : while True : while True : for i in range (10 ): if i > 3 : raise print (i) print ("跳过" ) print ("跳过" ) print ("跳过" ) print ("跳过" ) print ("跳过" ) except : print ("跳到这里啦!" )
类和对象 类是面向对象编程(OOP)的核心概念,Python 作为一门面向对象的语言,提供了完整的类与对象支持
属性 :
1 2 3 4 5 6 7 8 9 10 class Dog : species = "Canis familiaris" def __init__ (self, name, age ): self .name = name self .age = age buddy = Dog("Buddy" , 9 ) print (buddy.name) print (buddy.species)
方法 :
当通过实例调用方法时,Python 会自动将实例作为第一个参数(self)传递给方法
1 2 3 4 5 6 7 class MyClass : def instance_method (self ): print (f"实例方法被调用,self: {self} " ) obj = MyClass() obj.instance_method()
1 2 3 4 5 6 7 8 9 class Dog : def __init__ (self, name ): self .name = name def bark (self ): print (f"{self.name} says woof!" ) dog = Dog("Rex" ) dog.bark()
存取款示例:
1 2 3 4 5 6 7 8 9 10 11 12 13 14 15 16 17 18 19 20 21 22 23 24 25 26 class BankAccount : def __init__ (self, owner, balance=0 ): self .owner = owner self .balance = balance def deposit (self, amount ): if amount > 0 : self .balance += amount print (f"存入 {amount} ,当前余额: {self.balance} " ) else : print ("存款金额必须大于0" ) def withdraw (self, amount ): if 0 < amount <= self .balance: self .balance -= amount print (f"取出 {amount} ,当前余额: {self.balance} " ) else : print ("取款金额无效" ) account = BankAccount("Alice" , 1000 ) account.deposit(500 ) account.withdraw(200 ) account.withdraw(2000 )
私有变量/方法 在 Python 中,私有变量是一种约定大于强制的方式来实现封装。Python 没有真正的私有变量,但提供了几种方式来限制对类内部数据的访问
单下划线前缀 _variable:
约定 :表示”受保护”的变量,外部可以访问但不建议作用 :提示开发者这是内部使用的变量
1 2 3 4 5 6 7 8 9 10 class MyClass : def __init__ (self ): self ._protected_var = 10 def _protected_method (self ): print ("这是受保护方法" ) obj = MyClass() print (obj._protected_var) obj._protected_method()
双下划线前缀 __variable:
**名称修饰(Name Mangling)**:Python 会重写变量名:__variable → _ClassName__variable
作用 :避免子类意外覆盖父类属性
1 2 3 4 5 6 7 8 9 10 11 12 class MyClass : def __init__ (self ): self .__private_var = 20 def __private_method (self ): print ("这是私有方法" ) obj = MyClass() print (obj._MyClass__private_var) obj._MyClass__private_method()
私有变量的访问控制:
1 2 3 4 5 6 7 class C : def __init__ (self, x ): self .__x = x def get_x (self ): print (self .__x) def set_x (self, x ): self .__x = x
封装 封装是面向对象编程的三大特性之一,隐藏对象的内部实现细节,仅对外暴露必要的接口
最小暴露原则 :
只暴露必要的接口
使用单下划线 _ 表示受保护成员
使用双下划线 __ 表示私有成员(名称修饰)
使用属性装饰器 :
保持方法单一职责 :
防御式编程 :
文档化接口 :
为公共方法添加docstring
说明参数、返回值和可能抛出的异常
使用命名约定实现封装
1 2 3 4 5 6 7 8 9 10 11 12 13 14 15 16 17 18 19 20 21 22 23 24 25 26 27 28 29 30 31 32 33 34 35 36 37 38 39 40 41 42 43 44 45 class BankAccount : def __init__ (self, account_holder, initial_balance=0 ): self .account_holder = account_holder self ._balance = initial_balance self .__transaction_history = [] def deposit (self, amount ): """公开方法 - 存款""" if amount > 0 : self ._balance += amount self .__add_transaction(f"存款: +{amount} " ) return True return False def withdraw (self, amount ): """公开方法 - 取款""" if 0 < amount <= self ._balance: self ._balance -= amount self .__add_transaction(f"取款: -{amount} " ) return True return False def __add_transaction (self, record ): """私有方法 - 记录交易""" self .__transaction_history.append(record) def get_balance (self ): """公开方法 - 获取余额""" return self ._balance def get_recent_transactions (self, count=5 ): """公开方法 - 获取最近交易记录""" return self .__transaction_history[-count:] account = BankAccount("张三" , 1000 ) account.deposit(500 ) account.withdraw(200 ) print (f"当前余额: {account.get_balance()} " ) print ("最近交易:" , account.get_recent_transactions())print (account._BankAccount__transaction_history)
继承 继承是面向对象编程的三大特性之一,允许基于已有的类创建新类
基本示例
1 2 3 4 5 6 7 8 9 10 11 12 13 14 class Animal : def __init__ (self, name ): self .name = name def speak (self ): print ("动物发出声音" ) class Dog (Animal ): pass dog = Dog("旺财" ) print (dog.name) dog.speak()
方法重写
1 2 3 4 5 6 class Cat (Animal ): def speak (self ): print (f"{self.name} 说: 喵喵~" ) cat = Cat("小花" ) cat.speak()
使用 super() 调用父类方法
1 2 3 4 5 6 7 8 9 10 class LoudDog (Dog ): def speak (self ): super ().speak() print ("汪汪汪!!!" ) loud_dog = LoudDog("大黄" ) loud_dog.speak()
扩展init
1 2 3 4 5 6 7 class Bird (Animal ): def __init__ (self, name, can_fly ): super ().__init__(name) self .can_fly = can_fly bird = Bird("小蓝" , True ) print (f"{bird.name} 能飞吗? {'能' if bird.can_fly else '不能' } " )
多重继承 一个类同时继承多个父类
1 2 3 4 5 6 7 8 9 10 11 12 13 14 15 16 17 class Parent1 : def method1 (self ): print ("Parent1的方法" ) class Parent2 : def method2 (self ): print ("Parent2的方法" ) class Child (Parent1, Parent2): def child_method (self ): print ("子类的方法" ) child = Child() child.method1() child.method2() child.child_method()
方法解析顺序(MRO) 有三种方式查看类的 MRO:
使用 __mro__ 属性
使用 mro() 方法
使用 inspect.getmro()
1 2 3 4 print (D.__mro__)print (D.mro())import inspectprint (inspect.getmro(D))
1 2 3 4 5 6 7 8 9 10 11 12 13 14 class A : def method (self ): print ("A" ) class B : def method (self ): print ("B" ) class C (A, B): pass c = C() c.method()
1 2 3 4 5 6 7 8 9 10 11 12 13 14 15 16 17 18 19 20 21 class A : def method (self ): print ("A的方法" ) class B (A ): def method (self ): print ("B的方法" ) class C (A ): def method (self ): print ("C的方法" ) class D (B, C): pass print (D.__mro__)d = D() d.method()
在多重继承中,super()按照MRO顺序调用父类方法:
1 2 3 4 5 6 7 8 9 10 11 12 13 14 15 16 17 18 19 20 class A : def __init__ (self ): print ("A的初始化" ) super ().__init__() class B : def __init__ (self ): print ("B的初始化" ) super ().__init__() class C (A, B): def __init__ (self ): print ("C的初始化" ) super ().__init__() c = C()
菱形继承问题(钻石继承) 钻石继承或称菱形继承是多重继承中的一个经典问题,当多个子类继承自同一个父类,而另一个类又同时继承这些子类时,就会形成钻石形状的继承结构
问题演示:
1 2 3 4 5 6 7 8 9 10 11 12 13 14 15 16 17 18 19 20 21 22 23 24 25 26 27 class A : def __init__ (self ): print ("A的初始化" ) class B (A ): def __init__ (self ): print ("B的初始化" ) A.__init__(self ) class C (A ): def __init__ (self ): print ("C的初始化" ) A.__init__(self ) class D (B, C): def __init__ (self ): print ("D的初始化" ) B.__init__(self ) C.__init__(self ) d = D()
为什么需要 super()
1 2 3 4 5 6 7 8 9 10 11 12 13 14 15 16 17 18 19 20 21 22 23 24 25 26 class A : def method (self ): print ("A的方法" ) class B (A ): def method (self ): print ("B的方法" ) super ().method() class C (A ): def method (self ): print ("C的方法" ) super ().method() class D (B, C): def method (self ): print ("D的方法" ) super ().method() d = D() d.method()
继承关系图:
组合 将其他类的实例作为类的成员变量来实现功能复用
汽车:
1 2 3 4 5 6 7 8 9 10 11 12 13 14 15 16 17 18 19 20 21 22 23 24 25 class Engine : def start (self ): print ("引擎启动" ) def stop (self ): print ("引擎停止" ) class Car : def __init__ (self ): self .engine = Engine() def start (self ): self .engine.start() print ("汽车启动" ) def stop (self ): self .engine.stop() print ("汽车停止" ) my_car = Car() my_car.start()
游戏角色装备系统:
1 2 3 4 5 6 7 8 9 10 11 12 13 14 15 16 17 18 19 20 21 22 23 24 25 26 27 28 29 30 31 32 33 34 35 36 37 38 39 40 41 42 43 44 45 46 47 48 49 50 51 52 class Weapon : def __init__ (self, name, damage ): self .name = name self .damage = damage def attack (self ): print (f"使用 {self.name} 造成 {self.damage} 点伤害" ) class Armor : def __init__ (self, name, defense ): self .name = name self .defense = defense def defend (self ): print (f"穿戴 {self.name} 提供 {self.defense} 点防御" ) class Character : def __init__ (self, name ): self .name = name self .weapon = None self .armor = None def equip_weapon (self, weapon ): self .weapon = weapon print (f"{self.name} 装备了 {weapon.name} " ) def equip_armor (self, armor ): self .armor = armor print (f"{self.name} 穿戴了 {armor.name} " ) def fight (self ): if self .weapon: self .weapon.attack() else : print (f"{self.name} 赤手空拳攻击" ) def show_defense (self ): if self .armor: self .armor.defend() else : print (f"{self.name} 没有任何防护" ) sword = Weapon("圣剑" , 50 ) shield = Armor("龙鳞盾" , 30 ) hero = Character("勇者" ) hero.equip_weapon(sword) hero.equip_armor(shield) hero.fight() hero.show_defense()
GUI组件系统:
1 2 3 4 5 6 7 8 9 10 11 12 13 14 15 16 17 18 19 20 21 22 23 24 25 26 27 28 29 30 31 32 33 34 class Button : def __init__ (self, text ): self .text = text def render (self ): print (f"渲染按钮: {self.text} " ) class TextField : def __init__ (self, placeholder ): self .placeholder = placeholder def render (self ): print (f"渲染文本框: {self.placeholder} " ) class Panel : def __init__ (self ): self .components = [] def add_component (self, component ): self .components.append(component) def render (self ): print ("开始渲染面板 ---" ) for component in self .components: component.render() print ("--- 面板渲染结束" ) login_panel = Panel() login_panel.add_component(TextField("用户名" )) login_panel.add_component(TextField("密码" )) login_panel.add_component(Button("登录" )) login_panel.render()
混入类(Mixin) 混入类(Mixin)是一种特殊的设计模式,通过多重继承为类添加特定功能,而不影响类的主继承层次。Mixin 类通常不是独立存在的,而是用来”混入”其他类中
Mixin 基本特征:
单一功能 :每个 Mixin 只提供一种特定功能不独立使用 :Mixin 类本身通常不实例化不继承其他类 :Mixin 通常只继承 object**无 __init__**:避免与主类的初始化冲突
基本示例:
1 2 3 4 5 6 7 8 9 10 11 12 13 14 15 16 17 18 19 20 21 22 23 24 25 26 27 28 29 30 31 32 33 34 35 class JsonMixin : """添加JSON序列化功能""" def to_json (self ): import json return json.dumps(self .__dict__) class XmlMixin : """添加XML序列化功能""" def to_xml (self ): from xml.etree.ElementTree import Element, tostring el = Element(self .__class__.__name__) for k, v in self .__dict__.items(): child = Element(k) child.text = str (v) el.append(child) return tostring(el) class Person : def __init__ (self, name, age ): self .name = name self .age = age class JsonPerson (Person, JsonMixin): pass class UniversalPerson (Person, JsonMixin, XmlMixin): pass p1 = JsonPerson("Alice" , 25 ) print (p1.to_json()) p2 = UniversalPerson("Bob" , 30 ) print (p2.to_json())print (p2.to_xml())
1 2 3 4 5 6 7 8 9 10 11 12 13 14 15 16 17 18 19 20 21 22 23 24 25 26 27 28 29 30 31 32 33 34 class Displayer : def display (self, message ): print (message) class LoggerMixin : def log (self, message, filename="logfile.txt" ): with open (filename, 'a' ) as f: f.write(message) def display (self, message ): super ().display(message) self .log(message) class MySubClass (LoggerMixin, Displayer): def log (self, message ): super ().log(message, filename="subclasslog.txt" ) subclass = MySubClass() subclass.display("This is a test" ) print (MySubClass.mro())[<class '__main__.MySubClass' >, <class '__main__.LoggerMixin' >, <class '__main__.Displayer' >, <class 'object' >] 执行流程 当调用subclass.display("This is a test" )时: 首先找到LoggerMixin的display()方法 super ().display()会沿着MRO链找到Displayer.display()并执行打印然后调用self .log(),此时会使用子类重写的log()方法 子类的log()通过super ()调用父类LoggerMixin.log(),但传入了新的文件名参数
命名约定:
1 2 3 4 5 6 7 class LoggableMixin : pass class SerializableAbility : pass
方法覆盖处理:
1 2 3 4 5 6 7 8 9 10 11 12 13 14 15 16 17 18 19 20 21 22 23 class BaseMixin : def method (self ): print ("BaseMixin" ) if hasattr (super (), 'method' ): super ().method() class OtherMixin : def method (self ): print ("OtherMixin" ) if hasattr (super (), 'method' ): super ().method() class MyClass (BaseMixin, OtherMixin): def method (self ): print ("MyClass" ) super ().method() obj = MyClass() obj.method()
多态 多态是面向对象编程的三大特性之一,指同一操作作用于不同类的实例时,能产生不同的执行结果(根据不同的对象执行不同的操作)
基于继承的多态 :子类重写父类方法鸭子类型多态 :不依赖继承,只要对象有相应方法即可运算符重载 :通过特殊方法实现多态行为
1 2 3 4 5 6 7 8 9 10 11 12 13 3 + 5 8 3 * 5 15 "My" + "Class" 'MyClass' "My" * 3 'MyMyMy'
计算面积(基于继承的多态):
1 2 3 4 5 6 7 8 9 10 11 12 13 14 15 16 17 18 19 20 21 22 23 24 25 26 27 28 29 30 31 32 33 34 35 36 37 38 39 40 41 42 43 class Shape : def __init__ (self, name ): self .name = name def area (self ): pass class Square (Shape ): def __init__ (self, length ): self .name = "正方形" self .length = length def area (self ): return self .length ** 2 class Circle (Shape ): def __init__ (self, radius ): self .name = "圆形" self .radius = radius def area (self ): return 3.14 * self .radius * self .radius class Triangle (Shape ): def __init__ (self, base, height ): self .name = "三角形" self .base = base self .height = height def area (self ): return self .base * self .height / 2 def Calculate_area (FlatGraphics ): FlatGraphics.area s = Square(5 ) c= Circle(6 ) t = triangle(3 , 4 ) s.name '正方形' c.name '圆形' t.name '三角形' s.area() 25 c.area() 113.03999999999 t.area 6.0
1 2 3 4 5 6 7 8 9 10 11 12 13 14 15 16 17 18 class Animal : def speak (self ): raise NotImplementedError("子类必须实现speak方法" ) class Dog (Animal ): def speak (self ): return "汪汪!" class Cat (Animal ): def speak (self ): return "喵喵~" def animal_speak (animal ): animal.speak() animal_speak(Dog()) animal_speak(Cat())
鸭子类型多态:
鸭子类型是 Python 的重要特性,源自名言:
“如果走起来像鸭子,叫起来像鸭子,那么就是鸭子”
鸭子类型的特点
不检查类型 :关注对象的行为而非类型不需要继承 :只要对象有需要的方法/属性即可更灵活 :不强制要求类关系
1 2 3 4 5 6 7 8 9 10 11 12 13 14 15 16 17 18 19 20 21 22 23 24 25 26 27 class Duck : def quack (self ): print ("鸭子叫: 嘎嘎嘎" ) def fly (self ): print ("鸭子飞" ) class Person : def quack (self ): print ("人模仿鸭子叫: 呱呱呱" ) def fly (self ): print ("人挥动手臂" ) def in_the_forest (obj ): obj.quack() obj.fly() in_the_forest(Duck()) in_the_forest(Person())
多态与鸭子类型的比较
特性
传统多态
鸭子类型
类型检查
基于继承层次
基于方法/属性存在性
灵活性
较低,需要预先定义继承关系
高,任何对象只要实现方法即可
显式关系
需要显式继承
不需要显式声明关系
典型语言
Java, C++
Python, Ruby
错误发现时机
编译时
运行时
__slots__ 详解__slots__ 是 Python 中一个特殊的类属性,用于显式声明类实例可以拥有的属性,从而优化内存使用和提高属性访问速度
普通类使用 __dict__ 字典存储属性,占用更多内存:
1 2 3 4 5 6 7 8 9 10 11 12 13 14 class C : def __init__ (self, x ): self .x = x c = C(250 ) c.__dict__ {'x' : 250 } c.y = 520 c.__dict__ {'x' : 250 , 'y' : 520 } c.__dict__['z' ] = 666 c.z 666
使用 __slots__ 的类用固定大小的数组存储属性,节省内存(限制实例只能拥有预定义的属性,适用于将来不会动态添加属性的类):
1 2 3 4 5 6 7 8 9 10 11 12 13 14 15 16 17 18 19 20 class Person : __slots__ = ['name' , 'age' ] def __init__ (self, name, age ): self .name = name self .age = age p = Person("张三" , 30 ) print (p.name) print (p.age) class D : __slots__ = ["x" , "y" ] def __init__ (self, x, y, z ): self .x = x self .y = y self .z = z d = D(3 , 4 , 5 )
继承行为:
1 2 3 4 5 6 7 8 9 10 11 12 13 14 15 16 17 18 19 20 21 22 23 24 25 26 class Parent : __slots__ = ['name' ] class Child (Parent ): pass class StrictChild (Parent ): __slots__ = [] class ExtendedChild (Parent ): __slots__ = ['age' ] p = Parent() c = Child() sc = StrictChild() ec = ExtendedChild() c.new_attr = 1 c.__slots__ c.__dict__ ec.age = 10
魔法方法(Magic Methods)详解 魔法方法(也称为特殊方法或双下方法)是 Python 中由双下划线(__)包围的特殊方法,允许类实现并响应语言的各种内置操作
__new__方法
第一个被调用的方法 :在实例创建时最先执行必须返回实例 :通常返回父类的 __new__ 结果控制实例创建 :可以决定是否创建新实例
__new__ 是 Python 中真正创建实例的方法,是一个静态方法(不需要 @staticmethod 装饰器),在 __init__ 之前被调用
1 2 3 4 5 6 7 8 9 10 11 12 13 14 class MyClass : def __new__ (cls, *args, **kwargs ): print ("__new__ 被调用" ) instance = super ().__new__(cls) return instance def __init__ (self, value ): print ("__init__ 被调用" ) self .value = value obj = MyClass(10 )
1 2 3 4 5 6 7 8 class CapStr (str ): def __new__ (cls, string ): string = string.uppper() return supper().__new__(cls, string) cs = CapStr("demo" ) cs 'DEMO'
__del__ 方法__del__ 是对象的析构方法,当对象被垃圾回收时调用(不推荐依赖此方法进行资源清理)
不确定性 :调用时机由垃圾回收器决定不保证执行 :程序退出时可能不会调用不应用于关键资源释放 :应使用上下文管理器或显式释放
1 2 3 4 5 6 7 8 9 10 11 12 class Resource : def __init__ (self, name ): self .name = name print (f"资源 {self.name} 初始化" ) def __del__ (self ): print (f"资源 {self.name} 被释放" ) res = Resource("文件句柄" ) del res
循环引用问题
1 2 3 4 5 6 7 8 9 10 11 12 13 14 15 class Node : def __init__ (self, value ): self .value = value self .next = None def __del__ (self ): print (f"删除节点 {self.value} " ) a = Node(1 ) b = Node(2 ) a.next = b b.next = a
对象的重生 (创建一个该实例的新引用来推迟其销毁)
1 2 3 4 5 6 7 8 9 10 11 12 13 14 15 16 17 18 19 20 21 def E : def __init__ (self, name, func ): self .name = name self .func = func def __del__ (self ): self .func(self ) def outter (): x = 0 def inner (y=None ): if (y): x = y else : return x return innner f = outter() e = E("Jerry" , f) del eg = f() g.name
运算符重载魔法方法
运算符类别
方法名
对应运算符
描述
示例
一元运算符 __neg__-负号
-obj
__pos__+正号
+obj
__abs__abs()绝对值
abs(obj)
__invert__~按位取反
~obj
算术运算符 __add__+加法
obj1 + obj2
__sub__-减法
obj1 - obj2
__mul__*乘法
obj1 * obj2
__truediv__/真除法
obj1 / obj2
__floordiv__//地板除法
obj1 // obj2
__mod__%取模
obj1 % obj2
__pow__**幂运算
obj1 ** obj2
反向算术运算 __radd__+反向加法
obj2 + obj1
__rsub__-反向减法
obj2 - obj1
__rmul__*反向乘法
obj2 * obj1
__rtruediv__/反向真除法
obj2 / obj1
__rfloordiv__//反向地板除法
obj2 // obj1
__rmod__%反向取模
obj2 % obj1
__rpow__**反向幂运算
obj2 ** obj1
增量赋值运算 __iadd__+=增量加法
obj1 += obj2
__isub__-=增量减法
obj1 -= obj2
__imul__*=增量乘法
obj1 *= obj2
__itruediv__/=增量真除法
obj1 /= obj2
__ifloordiv__//=增量地板除法
obj1 //= obj2
__imod__%=增量取模
obj1 %= obj2
__ipow__**=增量幂运算
obj1 **= obj2
比较运算符 __eq__==等于
obj1 == obj2
__ne__!=不等于
obj1 != obj2
__lt__<小于
obj1 < obj2
__le__<=小于等于
obj1 <= obj2
__gt__>大于
obj1 > obj2
__ge__>=大于等于
obj1 >= obj2
类型转换 __int__int()转换为整数
int(obj)
__float__float()转换为浮点数
float(obj)
__bool__bool()转换为布尔值
bool(obj)
__str__str()转换为字符串
str(obj)
__repr__repr()官方字符串表示
repr(obj)
容器操作 __len__len()获取长度
len(obj)
__getitem__[]获取元素
obj[key]
__setitem__[]=设置元素
obj[key] = value
__delitem__del删除元素
del obj[key]
__contains__in成员测试
item in obj
调用操作 __call__()使实例可调用
obj(args)
上下文管理 __enter__with进入上下文
with obj as x:
__exit__with退出上下文
with obj as x:
拦截字符串的“加法”操作(继承重写__add__):
1 2 3 4 5 6 7 8 9 10 11 class S (str ): def __add__ (self, other ): return len (self ) + len (other) s1 = S("demo" ) s2 = S("other" ) s1 + s2 s1 + "python" "python" + s2 'pythonother'
__radd__ 是 Python 中的反向加法(reverse addition)魔法方法,用于处理当左操作数不支持加法操作时 的加法运算
1 2 3 4 5 6 7 8 9 10 class S1 (str ): def __add__ (self, other ): return NotImplemented class S2 (str ): def __radd__ (self, other ): return len (self ) + len (other) s1 = S1("Apple" ) s2 = S2("Banana" ) s1 + s2 11
属性访问相关魔法方法 Python 提供了一系列魔法方法来控制对对象属性的访问,这些方法可以实现属性访问的拦截、计算属性、属性保护等功能
Python 属性访问的完整查找顺序:
数据描述符 (__get__ 和 __set__)
实例属性 (obj.__dict__)
非数据描述符 (只有 __get__)
__getattr__ (如果前面都找不到)
__getattr__(self, name)
调用时机 :当访问不存在的属性时调用典型用途 :实现属性动态计算或惰性加载
1 2 3 4 5 6 7 class DynamicAttributes : def __getattr__ (self, name ): print (f"访问不存在的属性: {name} " ) return name.upper() obj = DynamicAttributes() print (obj.undefined_attr)
__setattr__(self, name, value)
调用时机 :当设置任何属性时调用(包括 __init__ 中的赋值)典型用途 :实现属性验证或触发副作用
1 2 3 4 5 6 7 8 9 10 class ValidatedAttributes : def __setattr__ (self, name, value ): if name == 'age' and value < 0 : raise ValueError("年龄不能为负数" ) super ().__setattr__(name, value) person = ValidatedAttributes() person.age = 25
__delattr__(self, name)
调用时机 :当删除属性时调用典型用途 :防止重要属性被删除或执行清理操作
1 2 3 4 5 6 7 8 9 10 11 12 class ProtectedAttributes : def __init__ (self ): self .important_data = "重要数据" def __delattr__ (self, name ): if name == 'important_data' : raise AttributeError("不能删除重要属性" ) super ().__delattr__(name) obj = ProtectedAttributes()
__getattribute__(self, name)
调用时机 :访问任何属性时都会调用(包括存在的属性)注意 :容易导致无限递归,必须谨慎使用
1 2 3 4 5 6 7 8 class AttributeLogger : def __getattribute__ (self, name ): print (f"访问属性: {name} " ) return super ().__getattribute__(name) logger = AttributeLogger() logger.x = 10 print (logger.x)
__dir__(self)
调用时机 :当调用 dir(obj) 时典型用途 :自定义对象的属性列表
1 2 3 4 5 6 class CustomDir : def __dir__ (self ): return ['attr1' , 'attr2' , 'method1' ] obj = CustomDir() print (dir (obj))
常见问题
__setattr__ 无限递归:
1 2 3 4 5 6 7 8 class BadExample : def __setattr__ (self, name, value ): self .name = value class GoodExample : def __setattr__ (self, name, value ): super ().__setattr__(name, value)
索引与切片相关魔法方法 __getitem__(self, key)
作用 :实现 obj[key] 的读取操作参数 :key 可以是整数、切片对象或其他类型返回值 :根据 key 返回对应的元素
1 2 3 4 5 6 7 8 9 10 11 class MySequence : def __init__ (self, data ): self .data = list (data) def __getitem__ (self, index ): print (f"读取索引/切片: {index} " ) return self .data[index] seq = MySequence(range (10 )) print (seq[3 ]) print (seq[1 :5 ])
__setitem__(self, key, value)
作用 :实现 obj[key] = value 的赋值操作参数 :key 可以是索引或切片,value 是要设置的值
1 2 3 4 5 6 7 8 9 10 11 12 class ModifiableSequence : def __init__ (self, data ): self .data = list (data) def __setitem__ (self, index, value ): print (f"设置索引/切片: {index} = {value} " ) self .data[index] = value mseq = ModifiableSequence(range (5 )) mseq[2 ] = 100 mseq[1 :3 ] = [55 , 66 ] print (mseq.data)
__delitem__(self, key)
作用 :实现 del obj[key] 的删除操作参数 :key 可以是索引或切片
1 2 3 4 5 6 7 8 9 10 11 12 13 class DeletableSequence : def __init__ (self, data ): self .data = list (data) def __delitem__ (self, index ): print (f"删除索引/切片: {index} " ) del self .data[index] dseq = DeletableSequence(range (5 )) del dseq[3 ] print (dseq.data) del dseq[1 :3 ] print (dseq.data)
迭代相关魔法方法 可迭代对象 vs 迭代器
概念
要求
示例
可迭代对象
实现 __iter__
list, tuple, dict
迭代器
实现 __iter__ 和 __next__
file对象, generator
可迭代对象 :可以被迭代的对象(可以不是迭代器本身)迭代器 :实际执行迭代的对象(必须也是可迭代对象)
__iter__(self)
作用 :返回一个迭代器对象调用时机 :当对象被用于 for 循环或 iter() 函数时返回值 :必须返回实现了 __next__ 的迭代器对象
1 2 3 4 5 6 7 8 9 10 11 12 13 14 15 16 17 class CountDown : def __init__ (self, start ): self .start = start def __iter__ (self ): self .current = self .start return self def __next__ (self ): if self .current <= 0 : raise StopIteration value = self .current self .current -= 1 return value for num in CountDown(5 ): print (num)
__next__(self)
作用 :返回迭代的下一个值调用时机 :每次迭代时由 next() 函数或 for 循环调用结束条件 :抛出 StopIteration 异常表示迭代结束
1 2 3 4 5 6 7 8 9 10 x = [1 , 2 , 3 , 4 , 5 ] next (x)for i in x: print (i, end=' ' ) 1 2 3 4 5 _ = iter (x) next (_)
1 2 3 4 5 6 7 8 9 10 11 12 13 14 15 class Double : def __init__ (self, start, stop ): self .value = start - 1 self .stop = stop def __iter__ (self ): return self def __next__ (self ): if self .value = self .stop: raise StopIteration self .value += 1 return self .value * 2 d = Double(1 , 5 ) for i in d: print (i, end = ' ' ) 2 4 6 8 10
与比较运算相关的魔法方法 修改为比较字符串长度:
1 2 3 4 5 6 7 8 9 10 11 12 13 class S (str ): def __lt__ (self, other ): return len (self ) < len (other) def __le__ (self, other ): return len (self ) <= len (other) def __gt__ (self, other ): return len (self ) > len (other) def __ge__ (self, other ): return len (self ) >= len (other) def __eq__ (self, other ): return len (self ) == len (other) def __ne__ (self, other ): return len (self ) != len (other)
__eq__(self, other)
对应操作符:==
用于判断两个对象是否相等。
示例:
1 2 def __eq__ (self, other ): return self .value == other.value
__ne__(self, other)__lt__(self, other)
对应操作符:<
用于判断当前对象是否小于另一个对象。
示例:
1 2 def __lt__ (self, other ): return self .value < other.value
__gt__(self, other)
对应操作符:>
用于判断当前对象是否大于另一个对象。
示例:
1 2 def __gt__ (self, other ): return self .value > other.value
__le__(self, other)
对应操作符:<=
用于判断当前对象是否小于或等于另一个对象。
示例:
1 2 def __le__ (self, other ): return self .value <= other.value
__ge__(self, other)
对应操作符:>=
用于判断当前对象是否大于或等于另一个对象。
示例:
1 2 def __ge__(self, other): return self.value >= other.value
对象调用相关的魔法方法 与对象调用 相关的魔法方法(Magic Methods)允许对象像函数一样被调用,或者控制对象的创建、初始化、销毁等行为
__call__(self, \*args, \**kwargs)__init_subclass__(cls)__class_getitem__(cls, item)对象字符串表示 的魔法方法__str__(self)__repr__(self)__str__ vs __repr__ 对比
特性
__str____repr__
目标 用户可读的友好表示
明确的、无歧义的表示
触发场景 print(obj), str(obj), f-stringrepr(obj), 交互式环境, 调试
默认行为 如果未定义,调用 __repr__
如果未定义,返回 <__main__.Obj...>
是否应可 eval 不要求
建议返回合法的 Python 表达式
示例返回值 "Person(Alice, 25)""Person('Alice', age=25)"
代偿 某些方法未被实现时,Python 会尝试使用”代偿”(fallback)机制来提供功能
以迭代为例,迭代协议通过魔法方法 __iter__() 和 __next__() 实现,当这些方法未被实现时,Python 会尝试使用其他方法来提供迭代功能
使用 __getitem__ 实现迭代
首先查找 __iter__ 方法
如果不存在,创建一个内置迭代器尝试从0开始的整数索引
调用 __getitem__ 直到抛出 IndexError
1 2 3 4 5 6 7 8 9 class FallbackIterable : def __getitem__ (self, index ): if index >= 5 : raise IndexError return index * 2 for item in FallbackIterable(): print (item)
property() property() 是一个内置函数,用于将一个方法转换为属性(property) ,从而可以像访问属性一样调用方法,同时支持 getter、setter 和 deleter 逻辑。property() 可以以 函数形式 调用,也可以作为装饰器 使用(更常见)
1 property (fget=None , fset=None , fdel=None , doc=None )
**fget**:获取属性值的方法(getter)
**fset**:设置属性值的方法(setter)
**fdel**:删除属性时调用的方法(deleter)
**doc**:属性的文档字符串(可通过 help() 查看)
为什么使用 property?
封装性 :外部代码通过 obj.x 访问属性,而不需要知道内部是 _x。灵活性 :可以在 getter/setter 中添加额外逻辑(如验证、计算等)。兼容性 :以后可以修改内部实现而不影响外部代码。
1 2 3 4 5 6 7 8 9 10 11 12 13 14 15 16 17 18 19 20 21 22 23 24 25 26 27 28 29 30 class C : def __init__ (self ): self ._x = 250 def getx (self ): return self ._x def setx (self, value ): self ._x = value def delx (self ): del self ._x x = property (getx, setx, delx, "I'm the 'x' property." ) obj = C() print (obj.x) obj.x = 100 print (obj.x) del obj.x
装饰器形式(更常用)
1 2 3 4 5 6 7 8 9 10 11 12 13 14 15 16 17 18 19 20 21 22 23 24 25 26 27 28 29 class Circle : def __init__ (self, radius ): self ._radius = radius @property def radius (self ): """Getter:获取半径""" return self ._radius @radius.setter def radius (self, value ): """Setter:设置半径""" if value <= 0 : raise ValueError("半径必须为正数" ) self ._radius = value @radius.deleter def radius (self ): """Deleter:删除半径""" print ("警告:删除半径" ) del self ._radius c = Circle(5 ) print (c.radius) c.radius = 10
只读属性
如果只定义 @property 而不定义 setter,则属性是只读的 :
1 2 3 4 5 6 7 8 9 10 11 12 class Square : def __init__ (self, side ): self ._side = side @property def area (self ): """动态计算面积(只读)""" return self ._side ** 2 s = Square(4 ) print (s.area)
类方法(@classmethod) 特点
绑定到类本身 ,而不是实例。**第一个参数是 cls**(类对象),而不是 self。
可以访问和修改类属性 ,但不能直接访问实例属性。
通常用于工厂方法 或操作类级别的数据 。
1 2 3 4 5 class MyClass : @classmethod def my_class_method (cls, arg1, arg2 ): pass
1 2 3 4 5 6 7 8 9 10 11 12 13 14 15 16 class C : count = 0 def __init__ (self ): self .count += 1 @classmethod def get_count (cls ): print ("该类一共实例化了{cls.count}个对象" ) c1 = C() c2 = C() c3 = C() c3.get_count c3.count = 1 c3.get_count
1 2 3 4 5 6 7 8 9 10 11 12 13 14 15 16 17 18 19 20 21 22 23 24 25 26 class C : count = 0 @classmethod def add (cls ): cls.count += 1 def __init__ (self ): self .add() @classmethod def get_count (cls ): print ("该类一共实例化了{cls.count}个对象" ) class D : count = 0 class E : count = 0 c1 = C() d1, d2 = D(), D() e1, e2, e3 = E(), E(), E() c1.get_count() d1.get_count() e1.get_count()
静态方法 特点
不绑定到类或实例 ,没有 cls 或 self 参数。不能访问类属性或实例属性,只是一个普通函数 ,但逻辑上属于类。
通常用于工具函数 或与类相关但不依赖类状态的操作 。
语法
1 2 3 4 5 class MyClass : @staticmethod def my_static_method (arg1, arg2 ): pass
示例
1 2 3 4 5 6 7 8 9 10 class MathUtils : @staticmethod def add (a, b ): """静态方法:加法工具函数""" return a + b @staticmethod def circle_area (radius ): """计算圆的面积""" return 3.14 * radius ** 2
使用场景
工具函数 (如数学计算、格式转换)与类相关但不需要访问类状态 (如 circle_area 和 MathUtils 相关,但不依赖类属性)
类方法 vs 静态方法 vs 实例方法
方法类型
装饰器
第一个参数
访问类属性
访问实例属性
典型用途
实例方法 无
self可以
可以
操作实例数据
类方法 @classmethodcls可以
不可以
工厂方法、操作类属性
静态方法 @staticmethod无
不可以
不可以
工具函数、与类相关的独立逻
描述符 描述符是 Python 中一个强大的特性,允许你自定义属性访问的行为。描述符协议是 @property、@classmethod 和 @staticmethod 等装饰器的基础实现机制
描述符协议 由以下三个特殊方法组成:
__get__(self, obj, type=None)__set__(self, obj, value)__delete__(self, obj)
任何实现了至少一个上述方法 的类都称为描述符
根据实现的方法不同,描述符可分为两类:
数据描述符 :实现了 __set__ 或 __delete__ 方法非数据描述符 :只实现了 __get__ 方法
Python 属性查找时,数据描述符优先于实例字典中的属性,而非数据描述符则相反
简单描述符示例:
1 2 3 4 5 6 7 8 9 10 11 12 13 14 class SimpleDescriptor : def __get__ (self, obj, objtype=None ): print ("Getting value" ) return 42 def __set__ (self, obj, value ): print ("Setting value to" , value) class MyClass : attr = SimpleDescriptor() obj = MyClass() print (obj.attr) obj.attr = 100
带存储的描述符:
1 2 3 4 5 6 7 8 9 10 11 12 13 14 15 16 17 18 19 20 21 22 23 class Field : def __init__ (self ): self ._name = None def __set_name__ (self, owner, name ): self ._name = name def __get__ (self, obj, objtype=None ): if obj is None : return self return obj.__dict__.get(self ._name, None ) def __set__ (self, obj, value ): obj.__dict__[self ._name] = value class Person : name = Field() age = Field() p = Person() p.name = "Alice" p.age = 30 print (p.name, p.age)
验证描述符:
1 2 3 4 5 6 7 8 9 10 11 12 13 14 15 16 17 18 19 20 21 22 23 24 class PositiveNumber : def __init__ (self ): self ._name = None def __set_name__ (self, owner, name ): self ._name = name def __get__ (self, obj, objtype=None ): if obj is None : return self return obj.__dict__.get(self ._name, None ) def __set__ (self, obj, value ): if not isinstance (value, (int , float )) or value <= 0 : raise ValueError("必须是正数" ) obj.__dict__[self ._name] = value class Circle : radius = PositiveNumber() c = Circle() c.radius = 5 print (c.radius)
type()获取对象的类型(常用用法) 1 2 3 4 5 6 7 8 x = 42 print (type (x)) s = "hello" print (type (s)) def func (): pass print (type (func))
动态创建类(元编程用法) type() 也可以用来动态创建新的类:
1 class type (name, bases, dict , **kwds)
参数说明:
name
要创建的类的名称
将成为新类的 __name__ 属性
bases
包含基类的元组
将成为新类的 __bases__ 属性
如果为空,默认继承自 object
dict
包含类属性和方法的命名空间字典
将成为新类的 __dict__ 属性
可以包含方法、类变量等
**kwds
额外的元类控制参数
例如 metaclass 参数可以指定自定义元类
1 2 3 4 5 6 7 8 9 10 11 class C : def __init_subclass__ (cls, value1, value2 ): print ("父爱如山" ) cls.x = value1 cls.y = value2 D = type ("D" , (C,), dict (x=250 ), value1=520 , value2=666 ) D.x D.y
元类 元类是 Python 面向对象编程中最深奥的概念之一,被称为”类的类”,用于控制类的创建行为。**type 是所有类的默认元类**
1 2 3 4 5 6 7 8 9 10 11 12 13 14 15 16 17 18 19 class MyClass : pass print (type (MyClass))class MetaC (type ): pass class C (metaclass=MetaC): pass c = C() type (c)type (C)type (MetaC)
创建自定义元类 基本元类结构
1 2 3 4 5 6 7 8 class MyMeta (type ): def __new__ (mcs, name, bases, namespace, **kwargs ): return super ().__new__(mcs, name, bases, namespace) def __init__ (cls, name, bases, namespace, **kwargs ): super ().__init__(name, bases, namespace)
使用元类
1 2 class MyClass (metaclass=MyMeta): pass
元类核心方法 __new__ 方法控制类的创建过程,必须返回一个类对象。
1 2 3 4 def __new__ (mcs, name, bases, namespace, **kwargs ): namespace['version' ] = 1.0 return super ().__new__(mcs, name, bases, namespace)
__init__ 方法初始化已创建的类。
1 2 3 4 def __init__ (cls, name, bases, namespace, **kwargs ): cls.author = "Anonymous" super ().__init__(name, bases, namespace)
__prepare__ 方法 (Python 3.6+)控制类命名空间的创建。
1 2 3 4 @classmethod def __prepare__ (mcs, name, bases, **kwargs ): return collections.OrderedDict()
抽象基类 抽象基类(ABC)是 Python 中定义接口和强制子类实现特定方法的一种机制。通过 abc 模块实现,是面向对象设计中重要的工具特点:
不能被实例化的类
定义了一组必须由子类实现的方法和属性
提供了一种标准化的方式来定义接口
1 2 3 4 5 6 7 8 9 10 from abc import ABC, abstractmethodclass Shape (ABC ): @abstractmethod def area (self ): pass @abstractmethod def perimeter (self ): pass
抽象基类的主要作用:
定义接口规范
明确规定子类必须实现哪些方法
建立统一的API契约,确保所有子类具有一致的接口
强制实现约束
确保子类不会遗漏关键方法的实现
防止创建不完整的子类实现
实现多态
允许不同子类以不同方式实现相同接口
支持”一个接口,多种实现”的面向对象原则
类型检查
使用isinstance()和issubclass()进行类型验证
提供更严格的类型约束机制
组织代码结构
为相关类建立清晰的层次结构
提高代码的可读性和可维护性
特别适合需要严格接口定义的大型项目或框架开发
1 2 3 4 5 6 7 8 9 10 11 12 13 14 15 16 17 18 19 20 21 22 23 24 25 26 27 28 29 30 31 32 33 34 35 from abc import ABC, abstractmethodclass DataProcessor (ABC ): @abstractmethod def load_data (self, source ): """从数据源加载数据""" pass @abstractmethod def process_data (self ): """处理数据""" pass @abstractmethod def save_result (self, destination ): """保存处理结果""" pass class CSVProcessor (DataProcessor ): def load_data (self, source ): print (f"从CSV文件 {source} 加载数据" ) def process_data (self ): print ("处理CSV数据" ) def save_result (self, destination ): print (f"将结果保存到 {destination} " ) processor = CSVProcessor() processor.load_data("data.csv" ) processor.process_data() processor.save_result("result.csv" )
模块和包 模块 导入模块 1 2 3 4 5 6 7 8 9 10 11 import 模块名称from 模块名称 import 对象名称from 模块名称 import * import 模块名称 as 关联名称 from 模块名称 import 对象名称 as 关联名称
hello.py:
1 2 3 4 def say_Hello (): print ("Hello!" ) def say_Hi (): print ("Hi!" )
demo.py:
1 2 3 4 import hellohello.say_Hello() hello.say_Hi()
1 2 from hello import say_Hellosay_Hello()
__name__
__name__ 是一个内置变量,表示当前模块的名称当一个模块被直接运行时,__name__ 的值被设置为 "__main__"
当一个模块被导入时,__name__ 的值被设置为模块的文件名(不含 .py 扩展名)
双重用途 :允许一个文件既可以被其他模块导入使用,也可以作为独立脚本运行
1 2 3 4 5 6 7 def my_function (): print ("这是一个函数" ) if __name__ == "__main__" : print ("作为主程序运行" ) my_function()
测试代码隔离 :将模块的测试代码放在条件下,避免被导入时自动执行
1 2 3 4 5 6 7 def add (a, b ): return a + b if __name__ == "__main__" : print ("测试 add 函数:" , add(2 , 3 ))
包 包(Package)是Python模块组织的高级形式,用于将相关的模块组织在一起,形成层次化的命名空间
包是一个包含多个Python模块的特殊目录,具有以下特点:
必须包含__init__.py文件(即使是空文件)
可以包含子包(子目录)
形成层次化的模块命名空间
包结构示例
1 2 3 4 5 6 7 8 9 10 11 my_package/ # 包根目录 │── __init__.py # 包初始化文件 │── module1.py # 模块1 │── module2.py # 模块2 ├── subpackage1/ # 子包1 │ │── __init__.py │ │── submodule1.py │ └── submodule2.py └── subpackage2/ # 子包2 │── __init__.py └── submodule3.py
__init__.py基本作用:
标识目录为Python包
初始化包级别的代码
定义包级别的变量和函数
控制from package import *的行为
示例:
1 2 3 4 5 6 7 8 9 10 11 12 13 14 15 VERSION = '1.0' x = 520 from .module1 import main_function__all__ = ['main_function' , 'VERSION' ] print (f"Initializing {__name__} package" )
导入方式 基本导入:
1 2 3 4 5 6 7 8 9 10 11 import my_packagefrom my_package import module1from my_package.subpackage1 import submodule1from my_package.module2 import some_function
相对导入:
1 2 3 4 5 6 7 8 9 10 from . import submodule2from .. import module1from ..subpackage2 import submodule3